Apache Virtual Host Configuration Guide
This comprehensive guide covers Apache virtual host configuration on Linux systems, enabling you to host multiple websites on a single server.
Table of Contents
Introduction
What is a Virtual Host?
A Virtual Host is an Apache configuration that allows you to host multiple domains/websites on a single server. Apache uses the ServerName and ServerAlias directives to distinguish between different sites.
Benefits of Virtual Hosts:
Host multiple websites on one server
Efficient resource utilization
Separate configuration for each site
Individual log files per domain
Cost-effective hosting solution
Types of Virtual Hosts:
Name-based: Multiple domains on one IP address (most common)
IP-based: Each domain has its own IP address
Port-based: Different ports for different sites
Prerequisites
Before configuring virtual hosts, ensure you have:
# Check if Apache is installed
apache2 -v

# Install Apache if not present
sudo apt-get update
sudo apt-get install apache2
Required:
Apache2 web server installed
Root or sudo access
Domain name (or local hostname for testing)
Basic understanding of Linux commands
Optional (Recommended for Production):
DNS records configured (for production environments)
SSL certificate (for HTTPS - optional but recommended)
Firewall configured to allow HTTP/HTTPS traffic
Understanding Apache Directory Structure
Key directories and files:
/etc/apache2/
├── apache2.conf              # Main configuration file
├── sites-available/          # Virtual host configurations (disabled)
│   ├── 000-default.conf      # Default HTTP virtual host
│   └── default-ssl.conf      # Default HTTPS virtual host
├── sites-enabled/            # Active virtual hosts (symlinks)
├── mods-available/           # Available Apache modules
├── mods-enabled/             # Enabled Apache modules
└── conf-available/           # Additional configurations
Basic Virtual Host Configuration
Method 1: Standard Virtual Host File
Step 1: Create Virtual Host Configuration
Create a new configuration file in sites-available:
sudo nano /etc/apache2/sites-available/example.com.conf
Step 2: Add Virtual Host Configuration
 <VirtualHost *:80>
     # Domain configuration
     ServerName example.com
     ServerAlias www.example.com
     ServerAdmin admin@example.com

     # Document root (where your website files are located)
     DocumentRoot /var/www/html/example.com/public

     # Directory permissions
     <Directory /var/www/html/example.com/public>
         Options Indexes FollowSymLinks
         AllowOverride All
         Require all granted
     </Directory>

     # Log files
     ErrorLog ${APACHE_LOG_DIR}/example.com-error.log
     CustomLog ${APACHE_LOG_DIR}/example.com-access.log combined
 </VirtualHost>
Step 3: Create Document Root Directory
# Create directory structure
sudo mkdir -p /var/www/html/example.com/public

# Set proper ownership
sudo chown -R $USER:$USER /var/www/html/example.com/public

# Set proper permissions
sudo chmod -R 755 /var/www/html/example.com
Step 4: Create Test Page
echo "<h1>Welcome to example.com</h1>" | sudo tee /var/www/html/example.com/public/index.html
Step 5: Enable Virtual Host
# Enable the site
sudo a2ensite example.com.conf

# Test Apache configuration
sudo apache2ctl configtest

# Reload Apache
sudo systemctl reload apache2
Step 6: Configure Local Testing (Optional)
If testing locally without DNS:
# Edit hosts file
sudo nano /etc/hosts

# Add this line
127.0.0.1  example.com www.example.com
Method 2: Include Configuration from Project Directory
This method keeps configuration files within your project directory.
Step 1: Create Virtual Host Configuration in Project
sudo nano /var/www/html/myproject/vhost.conf
Step 2: Add Configuration
 <VirtualHost *:80>
     ServerName myproject.local
     ServerAlias www.myproject.local
     ServerAdmin webmaster@localhost
     DocumentRoot /var/www/html/myproject/public

     <Directory /var/www/html/myproject/public>
         Options Indexes FollowSymLinks MultiViews
         AllowOverride All
         Require all granted
     </Directory>

     ErrorLog ${APACHE_LOG_DIR}/myproject-error.log
     CustomLog ${APACHE_LOG_DIR}/myproject-access.log combined
 </VirtualHost>
Step 3: Include in Main Configuration
sudo nano /etc/apache2/sites-available/000-default.conf
Add at the bottom:
# Include project virtual host
Include /var/www/html/myproject/vhost.conf
Step 4: Reload Apache
sudo apache2ctl configtest
sudo systemctl reload apache2
Magento-Specific Virtual Host Configuration
For Magento applications, special configuration is required.
Step 1: Create Virtual Host Configuration
Create the configuration file in your Magento root:
sudo nano /var/www/html/magento/proxy-le-ssl.conf
Step 2: Add Magento Virtual Host Configuration
 <VirtualHost *:80>
     # Server configuration
     ServerName alpha.oneagrix.com
     ServerAlias www.alpha.oneagrix.com
     ServerAdmin webmaster@localhost

     # Magento requires DocumentRoot to point to pub directory
     DocumentRoot /var/www/html/magento/pub

     # Directory configuration for Magento
     <Directory /var/www/html/magento/pub>
         Options Indexes FollowSymLinks MultiViews
         AllowOverride All
         Require all granted
     </Directory>

     # Logging
     ErrorLog ${APACHE_LOG_DIR}/magento-error.log
     CustomLog ${APACHE_LOG_DIR}/magento-access.log combined

     # Optional: Enable rewrite module for Magento
     # RewriteEngine On
 </VirtualHost>
Step 3: Include Configuration in Apache
Open the default Apache configuration file:
sudo nano /etc/apache2/sites-available/000-default.conf
Add the include directive at the bottom of the file:
# Include Magento virtual host configuration
Include /var/www/html/magento/proxy-le-ssl.conf
Step 4: Enable Required Apache Modules
Magento requires specific Apache modules:
# Enable rewrite module (required for URL rewriting)
sudo a2enmod rewrite

# Enable headers module (required)
sudo a2enmod headers

# Test configuration
sudo apache2ctl configtest

# Restart Apache
sudo systemctl restart apache2
Note
SSL module is optional and only needed if you’re configuring HTTPS:
# Enable SSL module (optional - only for HTTPS)
sudo a2enmod ssl
sudo systemctl restart apache2
Step 5: Verify Configuration
Test if the virtual host is working:
# Check if site is accessible
curl -I http://alpha.oneagrix.com

# View Apache error logs if issues occur
sudo tail -f /var/log/apache2/magento-error.log
Step 6: Fix Magento HTTPS Issues (Optional)
Note
This step is only required if you’re using HTTPS/SSL with Magento. Skip this section if you’re using HTTP only.
If Magento admin or frontend is not working properly with HTTPS, check the database configuration.
Run SQL Query to Check HTTPS Settings:
SELECT * FROM `core_config_data` WHERE `path` LIKE '%web/secure%';
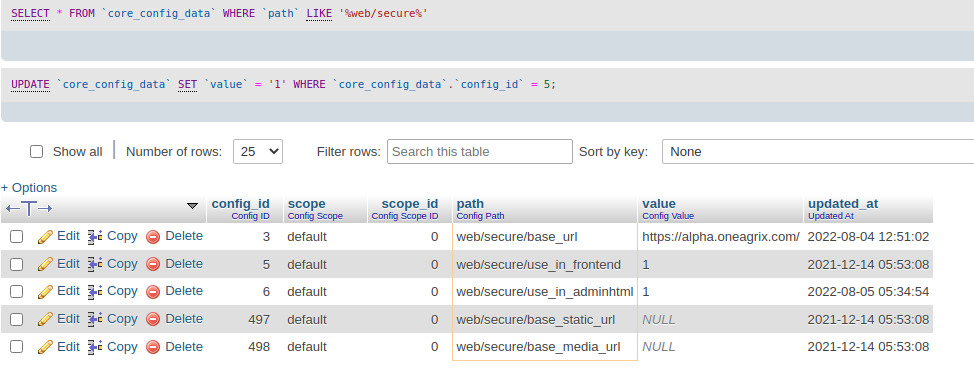
Fig. 33 SQL query to check secure web configuration
Update HTTPS Settings:
If web/secure/use_in_frontend or web/secure/use_in_adminhtml is set to 0, update it to 1:
-- Enable HTTPS for frontend
UPDATE `core_config_data`
SET `value` = '1'
WHERE `path` = 'web/secure/use_in_frontend';

-- Enable HTTPS for admin
UPDATE `core_config_data`
SET `value` = '1'
WHERE `path` = 'web/secure/use_in_adminhtml';
Alternative: Using Magento CLI
# Enable HTTPS for frontend
php bin/magento config:set web/secure/use_in_frontend 1

# Enable HTTPS for admin
php bin/magento config:set web/secure/use_in_adminhtml 1

# Clear cache
php bin/magento cache:flush
Reference: Magento HTTPS Configuration Guide
SSL/HTTPS Virtual Host Configuration (Optional)
Important
This section is optional. SSL/HTTPS is recommended for production environments but not required for development or local testing.
When to use SSL/HTTPS:
Production websites (highly recommended)
E-commerce sites (required for secure transactions)
Sites handling sensitive user data
To improve SEO rankings
To meet compliance requirements (PCI DSS, GDPR, etc.)
When SSL is not necessary:
Local development environments
Internal testing servers
Non-production environments
Configuring HTTPS with Let’s Encrypt
Step 1: Install Certbot
# Install Certbot and Apache plugin
sudo apt-get update
sudo apt-get install certbot python3-certbot-apache
Step 2: Obtain SSL Certificate
# Get certificate and auto-configure Apache
sudo certbot --apache -d example.com -d www.example.com

# Follow the prompts to configure HTTPS
Step 3: Verify SSL Configuration
Certbot automatically creates an SSL virtual host configuration. Check the file:
sudo nano /etc/apache2/sites-available/example.com-le-ssl.conf
Manual SSL Virtual Host Configuration
If you have an SSL certificate from another provider:
 <VirtualHost *:443>
     ServerName example.com
     ServerAlias www.example.com
     ServerAdmin admin@example.com
     DocumentRoot /var/www/html/example.com/public

     # SSL Configuration
     SSLEngine on
     SSLCertificateFile /etc/ssl/certs/example.com.crt
     SSLCertificateKeyFile /etc/ssl/private/example.com.key
     SSLCertificateChainFile /etc/ssl/certs/example.com.ca-bundle

     <Directory /var/www/html/example.com/public>
         Options Indexes FollowSymLinks
         AllowOverride All
         Require all granted
     </Directory>

     ErrorLog ${APACHE_LOG_DIR}/example.com-ssl-error.log
     CustomLog ${APACHE_LOG_DIR}/example.com-ssl-access.log combined
 </VirtualHost>
HTTP to HTTPS Redirect
Force all HTTP traffic to HTTPS:
 <VirtualHost *:80>
     ServerName example.com
     ServerAlias www.example.com

     # Redirect all HTTP to HTTPS
     RewriteEngine On
     RewriteCond %{HTTPS} off
     RewriteRule ^(.*)$ https://%{HTTP_HOST}$1 [R=301,L]
 </VirtualHost>
Enable SSL module and the site:
# Enable SSL module (if not already enabled)
sudo a2enmod ssl

# Enable the SSL virtual host
sudo a2ensite example.com-ssl.conf

# Test configuration
sudo apache2ctl configtest

# Reload Apache
sudo systemctl reload apache2
Common Apache Commands
Managing Virtual Hosts
# Enable a virtual host
sudo a2ensite example.com.conf

# Disable a virtual host
sudo a2dissite example.com.conf

# List enabled sites
ls -la /etc/apache2/sites-enabled/

# List available sites
ls -la /etc/apache2/sites-available/
Managing Apache Modules
# Enable a module
sudo a2enmod rewrite

# Disable a module
sudo a2dismod rewrite

# List enabled modules
apache2ctl -M
Apache Service Management
# Start Apache
sudo systemctl start apache2

# Stop Apache
sudo systemctl stop apache2

# Restart Apache
sudo systemctl restart apache2

# Reload Apache (graceful restart)
sudo systemctl reload apache2

# Check Apache status
sudo systemctl status apache2

# Enable Apache on boot
sudo systemctl enable apache2
Testing and Validation
# Test Apache configuration syntax
sudo apache2ctl configtest

# Test specific configuration file
sudo apache2ctl -t -D DUMP_VHOSTS

# Show loaded virtual hosts
sudo apache2ctl -S
Troubleshooting
Common Issues and Solutions
Issue: “Syntax error on line X”
# Check configuration syntax
sudo apache2ctl configtest

# View detailed error
sudo apache2ctl -t
Issue: Virtual host not working
# Check if site is enabled
ls -la /etc/apache2/sites-enabled/ | grep example.com

# Enable the site if not enabled
sudo a2ensite example.com.conf
sudo systemctl reload apache2
Issue: Permission denied errors
# Set correct ownership
sudo chown -R www-data:www-data /var/www/html/example.com

# Set correct permissions
sudo chmod -R 755 /var/www/html/example.com
Issue: Port already in use
# Check what's using port 80
sudo netstat -tulpn | grep :80

# Or use ss command
sudo ss -tulpn | grep :80

# Check Apache is not running multiple times
ps aux | grep apache2
Issue: Domain not resolving
# For local testing, add to /etc/hosts
sudo nano /etc/hosts
# Add: 127.0.0.1  example.com www.example.com

# For production, check DNS records
nslookup example.com
dig example.com
Issue: 403 Forbidden error
Check directory permissions and Apache configuration:
<Directory /var/www/html/example.com/public>
    Options Indexes FollowSymLinks
    AllowOverride All
    Require all granted  # Make sure this is set
</Directory>
Viewing Logs
# View Apache error log
sudo tail -f /var/log/apache2/error.log

# View site-specific error log
sudo tail -f /var/log/apache2/example.com-error.log

# View access log
sudo tail -f /var/log/apache2/example.com-access.log

# View all logs
sudo tail -f /var/log/apache2/*.log
Performance Optimization
Enable Compression
# Enable mod_deflate
sudo a2enmod deflate
sudo systemctl reload apache2
Enable Caching
# Enable caching modules
sudo a2enmod expires
sudo a2enmod headers
sudo systemctl reload apache2
Add to your virtual host:
# Enable browser caching
<IfModule mod_expires.c>
    ExpiresActive On
    ExpiresByType image/jpg "access plus 1 year"
    ExpiresByType image/jpeg "access plus 1 year"
    ExpiresByType image/gif "access plus 1 year"
    ExpiresByType image/png "access plus 1 year"
    ExpiresByType text/css "access plus 1 month"
    ExpiresByType application/javascript "access plus 1 month"
</IfModule>
Security Best Practices
Disable Directory Listing
<Directory /var/www/html/example.com/public>
    Options -Indexes FollowSymLinks
    AllowOverride All
    Require all granted
</Directory>
Hide Apache Version
sudo nano /etc/apache2/conf-available/security.conf
Update:
ServerTokens Prod
ServerSignature Off
Enable and reload:
sudo systemctl reload apache2
Limit Request Size
# Limit request body size to 10MB
LimitRequestBody 10485760
Conclusion
You now have a comprehensive understanding of Apache virtual host configuration. This guide covered:
Basic virtual host setup
Magento-specific configuration
SSL/HTTPS configuration
Common commands and troubleshooting
Security and performance optimization
Next Steps:
Configure SSL certificates for production
Set up monitoring and log rotation
Implement security hardening
Configure caching and optimization
Set up automated backups
Additional Resources: