Magento 2: RabbitMQ Message Queue
Overview
RabbitMQ is an open-source message broker that offers a reliable, highly available, scalable, and portable messaging system.
Message queues provide an asynchronous communications mechanism in which the sender and receiver of a message do not contact each other. They also don’t need to communicate with the message queue at the same time. When a sender places a message onto a queue, it is stored until the recipient receives it.
RabbitMQ is an open-source message queuing software implemented in Erlang OTP. It implements the AMQP (Advanced Message Queuing Protocol) and uses plugins to communicate with popular messaging solutions like MQTT (Message Queuing Telemetry Transport), Streaming Text Oriented Messaging Protocol, and others.
This guide covers the installation and configuration of RabbitMQ Server for Magento 2.
Important
The message queue system must be established before you install Magento.
Installation Sequence
The basic installation sequence is:
Install RabbitMQ and any prerequisites
Connect RabbitMQ to Magento
Code Structure
The message queue code is located in several different modules, which can make it difficult to navigate at first. However, each module has a distinct purpose:
Module Structure:
magento/framework-message-queue: Contains abstract message queue code that’s shared by all implementations
magento/module-message-queue: Contains the code needed to list and run consumers
magento/module-mysql-mq: Contains the code to create a database adapter (identified as
db)magento/module-amqp: Contains the code to create an AMQP adapter (RabbitMQ adapter, identified as
amqp)
Connection Adapters
Magento provides two connection adapters by default:
Database Adapter
The database adapter is a basic implementation that stores messages in database tables and uses cron to trigger message collection.
Database Tables:
queue: Contains a list of queues
queue_message: Contains message data in JSON format
queue_message_status: Contains status entries related to the queue_message table
Status Mapping:
2= New3= In Progress4= Complete5= Retry Required6= Error7= To Be Deleted
AMQP Adapter
The AMQP adapter defers message handling to an AMQP-compatible application, such as RabbitMQ. It does not require the additional tables and cleanup functionality of the database adapter.
Instead of creating database tables, the installer scripts create the necessary exchanges, queues, consumers, and bindings in RabbitMQ according to the latest queue configuration. These are kept up-to-date by a recurring installer script, which means that any changes to configuration in queue.xml are applied to RabbitMQ when running:
magento setup:upgrade
Reference: Magento CLI Commands
Message Queue Framework Architecture
The following diagram illustrates the Message Queue Framework:
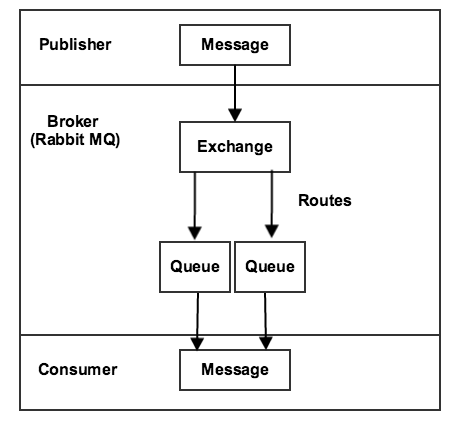
Fig. 13 Message Queue Framework Architecture
Components
- Publisher
A component that sends messages to an exchange. It knows which exchange to publish to and the format of the messages it sends.
- Exchange
Receives messages from publishers and sends them to queues.
- Queue
A buffer that stores messages.
- Consumer
Receives messages. It knows which queue to consume and can map message processors to specific queues.
Message Queue Status
Magento uses asynchronous operations for managing the MySQL implementation of the message queue.
Status Management
Magento stores queue status in the queue_message_status table to manage the relationship between queues and messages. The status column defines the status of message queues.
The QueueManagement class defines the following status constants:
const MESSAGE_STATUS_NEW = 2;
const MESSAGE_STATUS_IN_PROGRESS = 3;
const MESSAGE_STATUS_COMPLETE = 4;
const MESSAGE_STATUS_RETRY_REQUIRED = 5;
const MESSAGE_STATUS_ERROR = 6;
const MESSAGE_STATUS_TO_BE_DELETED = 7;
Status Descriptions:
Status 2 (New): Message is just generated and not yet processed
Status 3 (In Progress): Message processing has started but not yet completed
Status 4 (Complete): Message has been processed and completed successfully
Status 5 (Retry Required): Message requires retry and is not completed yet
Status 6 (Error): Message encountered an error during processing
Status 7 (To Be Deleted): Message is marked for deletion
Install RabbitMQ Server
Reference: https://www.vultr.com/docs/install-rabbitmq-server-ubuntu-20-04-lts
Install necessary packages:
sudo apt-get install wget apt-transport-https -y
Install the RabbitMQ repository signing key:
wget -O- https://www.rabbitmq.com/rabbitmq-release-signing-key.asc | sudo apt-key add -
Add the RabbitMQ repository:
echo "deb https://dl.bintray.com/rabbitmq-erlang/debian focal erlang-22.x" | sudo tee /etc/apt/sources.list.d/rabbitmq.list
Install RabbitMQ Server:
sudo apt-get install rabbitmq-server -y --fix-missing
Check the status of the RabbitMQ service:
sudo systemctl status rabbitmq-server
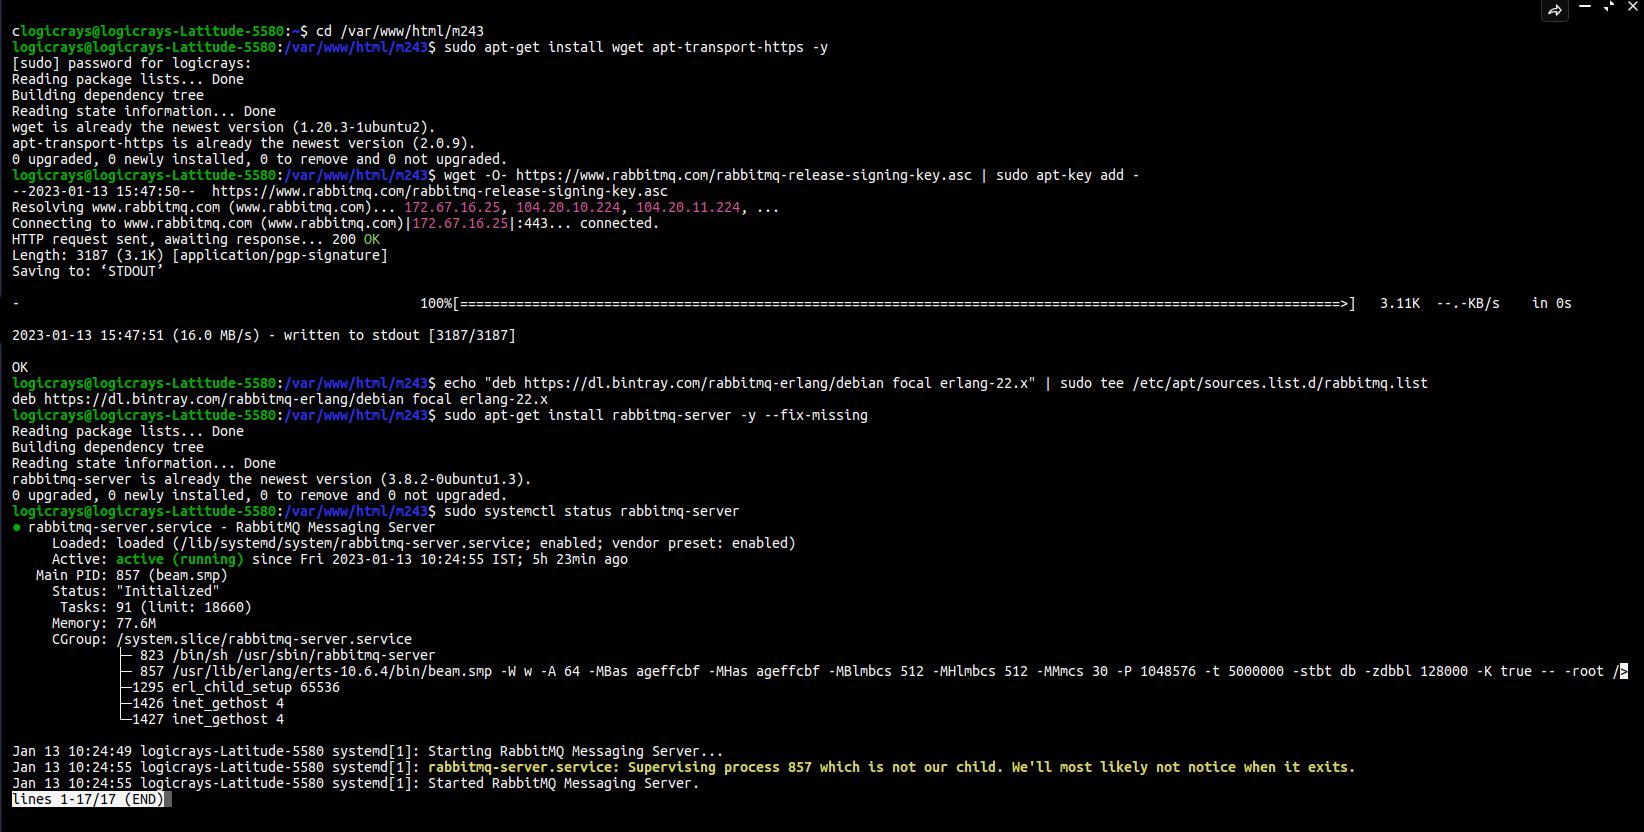
Fig. 14 RabbitMQ Server installation verification
Enable RabbitMQ Management Dashboard
The management dashboard allows you to interact with processes and control activities on the server.
sudo rabbitmq-plugins enable rabbitmq_management
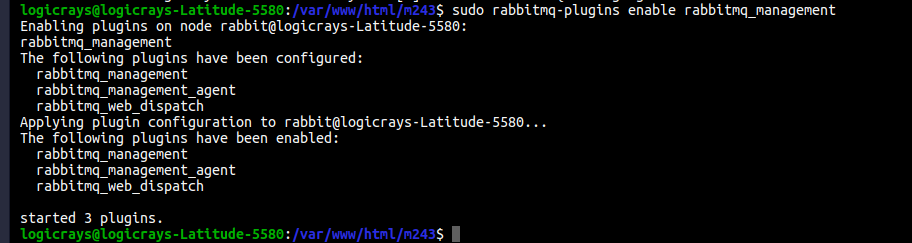
Fig. 15 RabbitMQ Management plugin enabled
Configure RabbitMQ
Reference: https://www.thegeekdiary.com/magento-2-rabbitmq-configuration/
The default user guest can only log in via localhost. You need to create an administrator account to access the dashboard remotely.
Note
Make sure to replace rabbitmq_pwd with your own secure password.
Create User with Permissions
We need to create a user with the appropriate permissions:
sudo rabbitmqctl add_user rabbitmq rabbitmq_pwd
sudo rabbitmqctl set_user_tags rabbitmq administrator
sudo rabbitmqctl set_permissions -p / rabbitmq ".*" ".*" ".*"
Create Queue
Create the required queue for Magento:
rabbitmqadmin --username=rabbitmq --password=rabbitmq_pwd declare queue --vhost=/ name=async.operations.all durable=true
Access Management Dashboard
After enabling the management portal plugin, access the dashboard through your browser at http://your_IP:15672 (port 15672 is the HTTP port for RabbitMQ management).
Example: http://127.0.0.1:15672/

Fig. 16 RabbitMQ Management Login
Login Credentials
Log in with the following credentials:
Username: rabbitmq
Password: rabbitmq_pwd (use the password you set earlier)
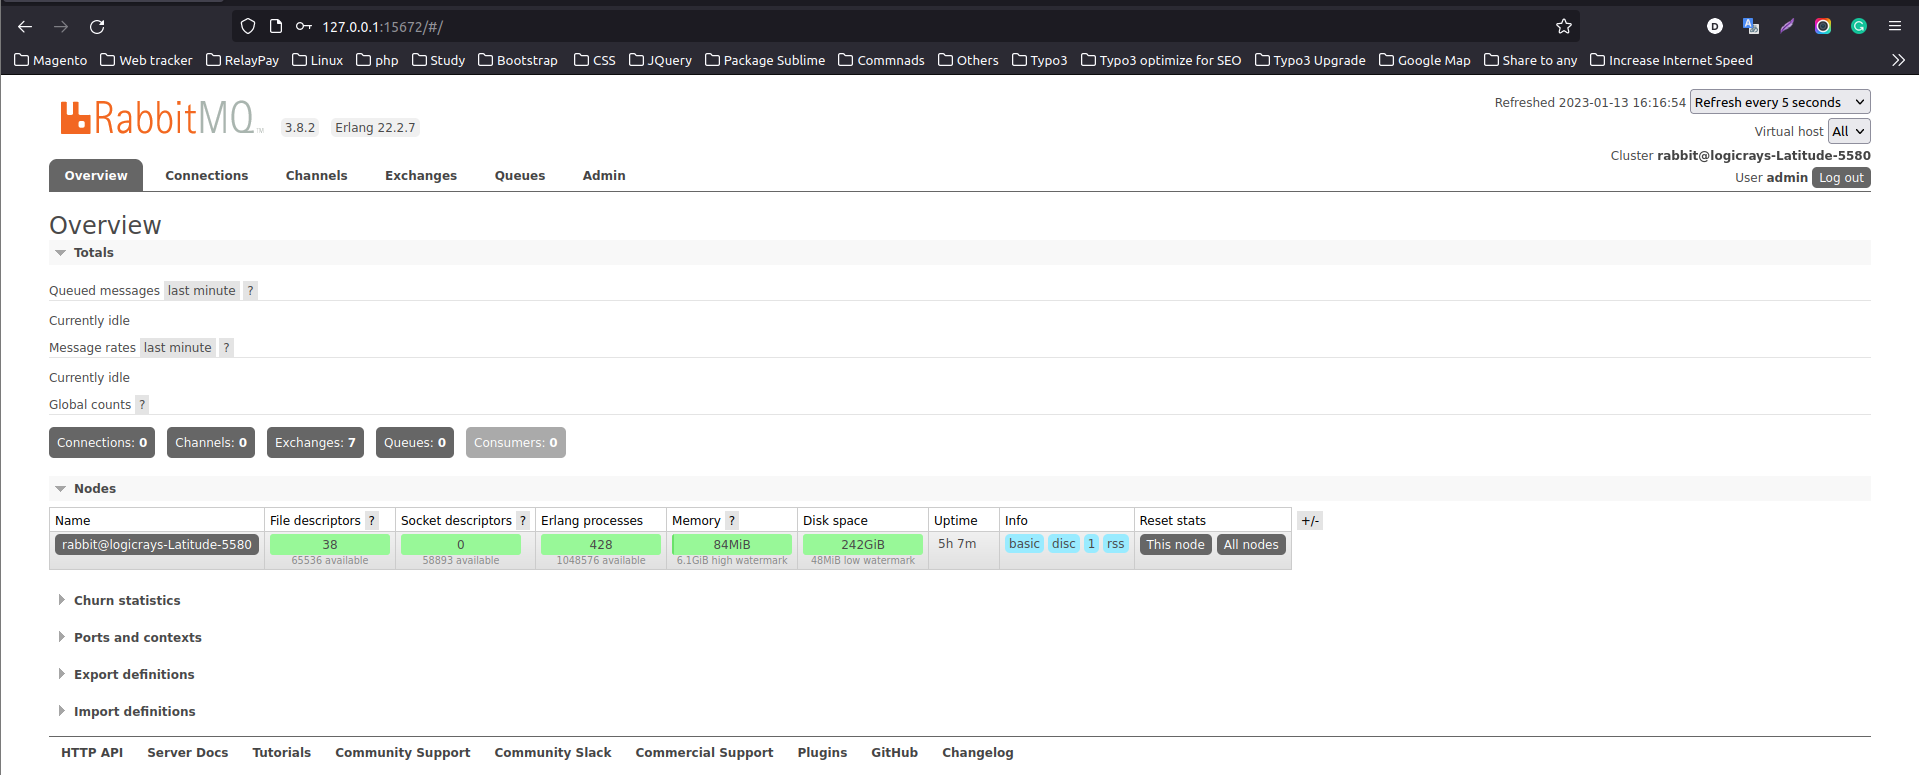
Fig. 17 RabbitMQ Management Dashboard
Fig. 18 RabbitMQ Management Dashboard
Magento 2 configuration
If you installed Magento after you installed RabbitMQ, add the following command line parameters when you install Magento Open Source or Adobe Commerce:
--amqp-host="<hostname>" --amqp-port="5672" --amqp-user="<your_user_name>" --amqp-password="<your_password>" --amqp-virtualhost="/"
where:
- –amqp-host
The hostname where RabbitMQ is installed.
- –amqp-port
The port to use to connect to RabbitMQ. Port on which RabbitMQ running. The default is 5672.
- –amqp-user
The username for connecting to RabbitMQ. Do not use the default user guest.
- –amqp-password
The password for connecting to RabbitMQ. Do not use the default password guest.
- –amqp-virtualhost
The virtual host for connecting to RabbitMQ. The default is
/.- –amqp-ssl
Indicates whether to connect to RabbitMQ. The default is false. If you set the value to true, see Configure SSL for more information.
Connect RabbitMQ to Magento Open Source or Adobe Commerce
First of all, We need to add rabbitmq configuration. It can be done in 2 ways:
Via bin/magento
php bin/magento setup:config:set --amqp-host="127.0.0.1" --amqp-port="5672" --amqp-user="rabbitmq" --amqp-password="rabbitmq_pwd" --amqp-virtualhost="/"
By editing app/etc/env.php with following lines
If you already had Magento installed and you want to connect it to RabbitMQ,
add a queue section in the <magento_root>/app/etc/env.php file so that it is similar to the following
'queue' => [
    'amqp' => [
        'host' => '127.0.0.1', //host of RabbitMQ
        'port' => '5672', //Port on which RabbitMQ running.
        'user' => 'rabbitmq', //RabbitMQ user name
        'password' => 'rabbitmq_pwd', //RabbitMQ password
        'virtualhost' => '/' //The virtual host for connecting to RabbitMQ. The default is /.
    ],
],
Also, you’ll need to add cron runner to app/etc/env.php:
'cron_consumers_runner' => [
    'cron_run' => true,
    'max_messages' => 0,
    'consumers' => [
        'async.operations.all',
        'codegeneratorProcessor'
    ]
]
That’s all. We successfully configured rabbitmq consumer in Magento.
RabbitMQ Example
- Create Magento Module
Logicrays_RabbitMQ
Create
registration.php<?php \Magento\Framework\Component\ComponentRegistrar::register( \Magento\Framework\Component\ComponentRegistrar::MODULE, 'Logicrays_RabbitMQ', __DIR__ );
Create
module.xmlfile into etc directory<?xml version="1.0"?> <config xmlns:xsi="http://www.w3.org/2001/XMLSchema-instance" xsi:noNamespaceSchemaLocation="urn:magento:framework:Module/etc/module.xsd"> <module name="Logicrays_RabbitMQ" setup_version="1.0.0"> </module> </config>
Firstly, we define exchange, topic, queue, publisher and consumer. As you may guess such configuration should be done in
XMLfiles (taken from official Magento message queues guide: https://developer.adobe.com/commerce/php/development/components/message-queues/configuration/):- communication.xml
Defines aspects of the message queue system that all communication types have in common.
- queue_consumer.xml
Defines the relationship between an existing queue and its consumer.
- queue_topology.xml
Defines the message routing rules and declares queues and exchanges.
- queue_publisher.xml
Defines the exchange where a topic is published.
Create a
etc/communication.xmlfile and define topic logicrays.product.delete<?xml version="1.0"?> <config xmlns:xsi="http://www.w3.org/2001/XMLSchema-instance" xsi:noNamespaceSchemaLocation="urn:magento:framework:Communication/etc/communication.xsd"> <topic name="logicrays.product.delete" request="Magento\Catalog\Api\Data\ProductInterface"/> </config>
Also, we specify data type of the topic in request attribute:
Magento\Catalog\Api\Data\ProductInterface.Then, create
etc/queue_topology.xmlfile and define logicrays.product exchange and bind LogicraysProductDelete to route logicrays.product.delete topic to logicrays_product_delete queue:<?xml version="1.0"?> <config xmlns:xsi="http://www.w3.org/2001/XMLSchema-instance" xsi:noNamespaceSchemaLocation="urn:magento:framework-message-queue:etc/topology.xsd"> <exchange name="logicrays.product" type="topic" connection="amqp"> <binding id="LogicraysProductDelete" topic="logicrays.product.delete" destinationType="queue" destination="logicrays_product_delete"/> </exchange> </config>
Note
connection type
amqpin the file above.Create
etc/queue_publisher.xmlfile. No publisher classes are specified here:<?xml version="1.0"?> <config xmlns:xsi="http://www.w3.org/2001/XMLSchema-instance" xsi:noNamespaceSchemaLocation="urn:magento:framework-message-queue:etc/publisher.xsd"> <publisher topic="logicrays.product.delete"> <connection name="amqp" exchange="logicrays.product" /> </publisher> </config>
Create a
etc/queue_consumer.xmlfile, we define consumer and specify class and method that processes message i.e. handler:<?xml version="1.0"?> <config xmlns:xsi="http://www.w3.org/2001/XMLSchema-instance" xsi:noNamespaceSchemaLocation="urn:magento:framework-message-queue:etc/consumer.xsd"> <consumer name="LogicraysProductDelete" queue="logicrays_product_delete" connection="amqp" handler="Logicrays\RabbitMQ\Model\Product\DeleteConsumer::processMessage"/> </config>
We are done with configuration. If everything is defined right after running
php bin/magento setup:upgradewe should have exchange and queue created on RabbitMQ server: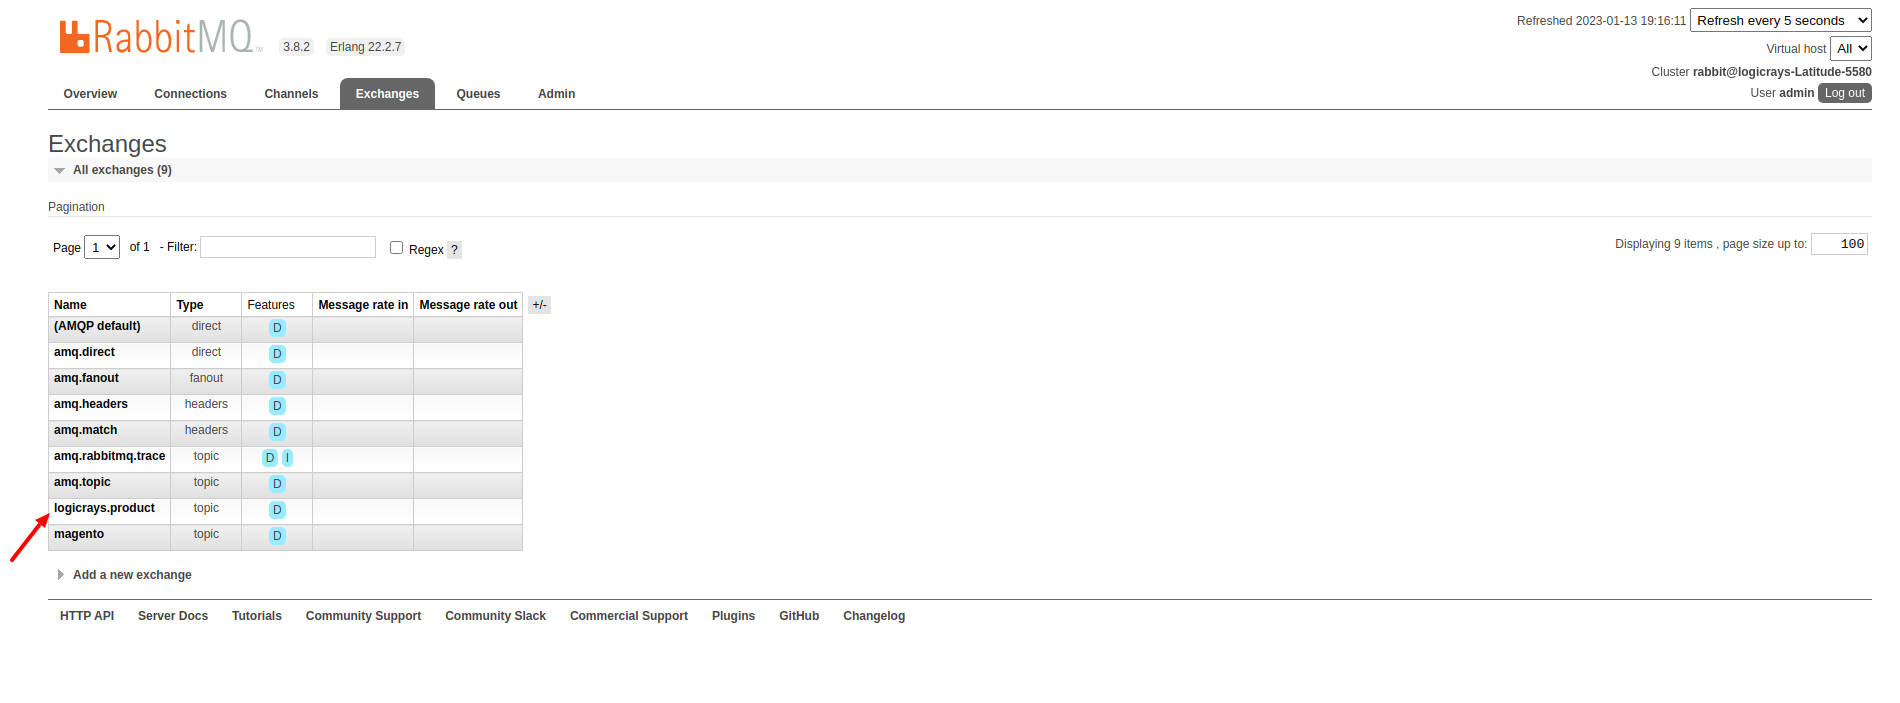
Let’s continue with creating publisher class.
It is
\Logicrays\RabbitMQ\Model\Product\DeletePublisher. Here we need to specify topic name as a constant and declare method that will publish a message to the queue.<?php namespace Logicrays\RabbitMQ\Model\Product; class DeletePublisher { public const TOPIC_NAME = 'logicrays.product.delete'; /** * @var \Magento\Framework\MessageQueue\PublisherInterface */ private $publisher; /** * @param \Magento\Framework\MessageQueue\PublisherInterface $publisher */ public function __construct(\Magento\Framework\MessageQueue\PublisherInterface $publisher) { $this->publisher = $publisher; } /** * @inheritdoc */ public function execute(\Magento\Catalog\Api\Data\ProductInterface $product) { $this->publisher->publish(self::TOPIC_NAME, $product); } }
Product object will be automatically encoded to JSON.
Next create a plugin where we track product delete event and call execute method of publisher:
<?xml version="1.0"?> <config xmlns:xsi="http://www.w3.org/2001/XMLSchema-instance" xsi:noNamespaceSchemaLocation="urn:magento:framework:ObjectManager/etc/config.xsd"> <type name="Magento\Catalog\Model\ResourceModel\Product"> <plugin name="publish_product_delete" type="Logicrays\RabbitMQ\Plugin\ProductDeletePlugin"/> </type> </config>
Create
ProductDeletePlugin.phpfile<?php namespace Logicrays\RabbitMQ\Model\Product; class DeletePublisher { public const TOPIC_NAME = 'logicrays.product.delete'; /** * @var \Magento\Framework\MessageQueue\PublisherInterface */ private $publisher; /** * @param \Magento\Framework\MessageQueue\PublisherInterface $publisher */ public function __construct(\Magento\Framework\MessageQueue\PublisherInterface $publisher) { $this->publisher = $publisher; } /** * @inheritdoc */ public function execute(\Magento\Catalog\Api\Data\ProductInterface $product) { $this->publisher->publish(self::TOPIC_NAME, $product); } }
Create handler
DeleteConsumer.phpthat we specified inqueue_consumer.xml<?php namespace Logicrays\RabbitMQ\Model\Product; use Magento\Framework\App\Filesystem\DirectoryList; use Magento\Framework\Exception\FileSystemException; class DeleteConsumer { /** * @var \Zend\Log\Logger */ private $logger; /** * @var string */ private $logFileName = 'product-delete-consumer.log'; /** * @var DirectoryList */ private $directoryList; /** * DeleteConsumer constructor. * @param DirectoryList $directoryList * @throws FileSystemException */ public function __construct( \Magento\Framework\App\Filesystem\DirectoryList $directoryList ) { $this->directoryList = $directoryList; $logDir = $directoryList->getPath('log'); $writer = new \Zend\Log\Writer\Stream($logDir . DIRECTORY_SEPARATOR . $this->logFileName); $logger = new \Zend\Log\Logger(); $logger->addWriter($writer); $this->logger = $logger; } /** * _processMessage * * @param \Magento\Catalog\Api\Data\ProductInterface $product * @throws \Magento\Framework\Exception\LocalizedException * @return void */ public function processMessage(\Magento\Catalog\Api\Data\ProductInterface $product) { $this->logger->info($product->getId() . ' ' . $product->getSku()); } }
processMessagemethod expects instance of\Magento\Catalog\Api\Data\ProductInterfaceas parameter.The last step is to start our consumer with command:
php bin/magento queue:consumers:start LogicraysProductDelete
You can download source code from here: https://github.com/dipakp-logicrays/rabbitmq-example
Basic Information about RabbitMQ files
You should create following files in below order.
communication.xml
queue_publisher.xml
queue_topology.xml
queue_consumer.xml
communication.xml
topic
nameshould be unique.requestwill be type like interface, string or other etc.Example:
<topic name="logicrays.product.delete" request="Magento\Catalog\Api\Data\ProductInterface"/>
queue_publisher.xml
publisher
topicis comes from thecommunication.xml’s topic name.connection
nameshould be amqp.connection
exchangeshould be unique.Example:
<publisher topic="logicrays.product.delete"> <connection name="amqp" exchange="logicrays.product" /> </publisher>
queue_topology.xml
exchange
nameis comes from thequeue_publisher.xml’s exchange value.exchange
typeshould queue.binding
idshould be unique.binding
topiccomes from thecommunication.xmltopic name.destinationTypeshould be queue.destinationshould be unique.Example:
<exchange name="logicrays.product" type="topic" connection="amqp"> <binding id="LogicraysProductDelete" topic="logicrays.product.delete" destinationType="queue" destination="logicrays_product_delete"/> </exchange>
queue_consumer.xml
consumer
nameshould be same as queue_topology.xml exchange’s binding id.queueis comes frome thequeue_topology.xml’s destination.connectionshould be amqp.handlerset the path of processMessage method.processMessageis method will consume the message.Example:
<consumer name="LogicraysProductDelete" queue="logicrays_product_delete" connection="amqp" handler="Logicrays\RabbitMQ\Model\Product\DeleteConsumer::processMessage"/>
Create Publisher Class
You have to create publisher class module root path or inside model directory.
I have
DeletePublisherclass insdideLogicrays\RabbitMQ\Model\Productdirectory.Define
const TOPIC_NAMEthat are created incommunication.xml.Example:
<?php

 namespace Logicrays\RabbitMQ\Model\Product;

 class DeletePublisher
 {
     public const TOPIC_NAME = 'logicrays.product.delete';

     /**
     * @var \Magento\Framework\MessageQueue\PublisherInterface
     */
     private $publisher;

     /**
     * @param \Magento\Framework\MessageQueue\PublisherInterface $publisher
     */
     public function __construct(\Magento\Framework\MessageQueue\PublisherInterface $publisher)
     {
         $this->publisher = $publisher;
     }

     /**
     * @inheritdoc
     */
     public function execute(\Magento\Catalog\Api\Data\ProductInterface $product)
     {
         $this->publisher->publish(self::TOPIC_NAME, $product);
     }
 }
How to consume message in queue
Finally, You have to use publisher class and consume to message from queue.
In
__construct, I have define custom logger.When successfully consume the our message from the queue, it will print the log into
<magento_root>/var/log/product-delete-consumer.log.Example:
 <?php

 namespace Logicrays\RabbitMQ\Model\Product;

 use Magento\Framework\App\Filesystem\DirectoryList;
 use Magento\Framework\Exception\FileSystemException;

 class DeleteConsumer
 {
     /**
     * @var \Zend\Log\Logger
     */
     private $logger;

     /**
     * @var string
     */
     private $logFileName = 'product-delete-consumer.log';

     /**
     * @var DirectoryList
     */
     private $directoryList;

     /**
     * DeleteConsumer constructor.
     * @param DirectoryList $directoryList
     * @throws FileSystemException
     */
     public function __construct(
         \Magento\Framework\App\Filesystem\DirectoryList $directoryList
     ) {
         $this->directoryList = $directoryList;
         $logDir = $directoryList->getPath('log');
         $writer = new \Zend\Log\Writer\Stream($logDir . DIRECTORY_SEPARATOR . $this->logFileName);
         $logger = new \Zend\Log\Logger();
         $logger->addWriter($writer);
         $this->logger = $logger;
     }

     /**
     * _processMessage
     *
     * @param \Magento\Catalog\Api\Data\ProductInterface $product
     * @throws \Magento\Framework\Exception\LocalizedException
     * @return void
     */
     public function processMessage(\Magento\Catalog\Api\Data\ProductInterface $product)
     {
         $this->logger->info($product->getId() . ' ' . $product->getSku());
     }
 }
Conversion of Magento 2 Queue from MySQL to AMQP
If you want to convert or migrate data of the Magento 2 Queue from MySQL to AMQP, execute the following operation: Generate coupon code operation using AMQP.
Add below code to
<magento_root>/app/etc/env.phpfile.<?php 'queue' => [ 'topics' => [ 'sales_rule.codegenerator' => [ 'publisher' => 'amqp-magento' ] ], 'config' => [ 'publishers' => [ 'sales_rule.codegenerator' => [ 'connections' => [ 'amqp' => [ 'name' => 'amqp', 'exchange' => 'magento', 'disabled' => false ], 'db' => [ 'name' => 'db', 'disabled' => true ] ] ] ] ], 'consumers' => [ 'sales_rule.codegenerator' => [ 'connection' => 'amqp', ], ], ],
Create cart price rule from admin and save it.
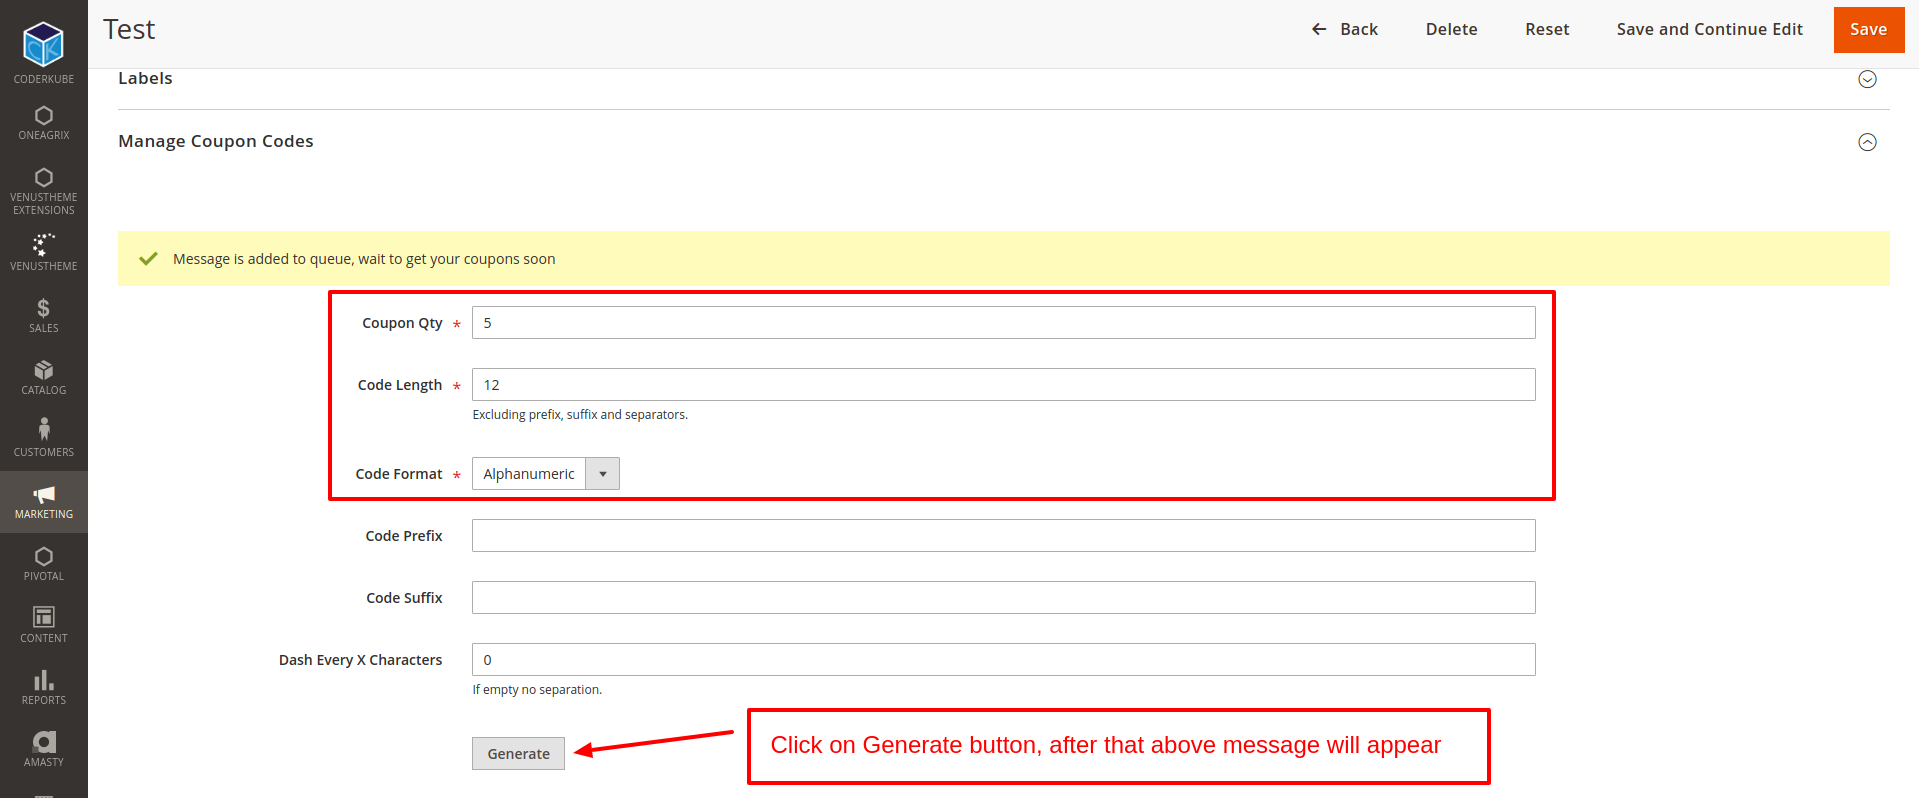
Generate specific coupon code.
Message added to queue now
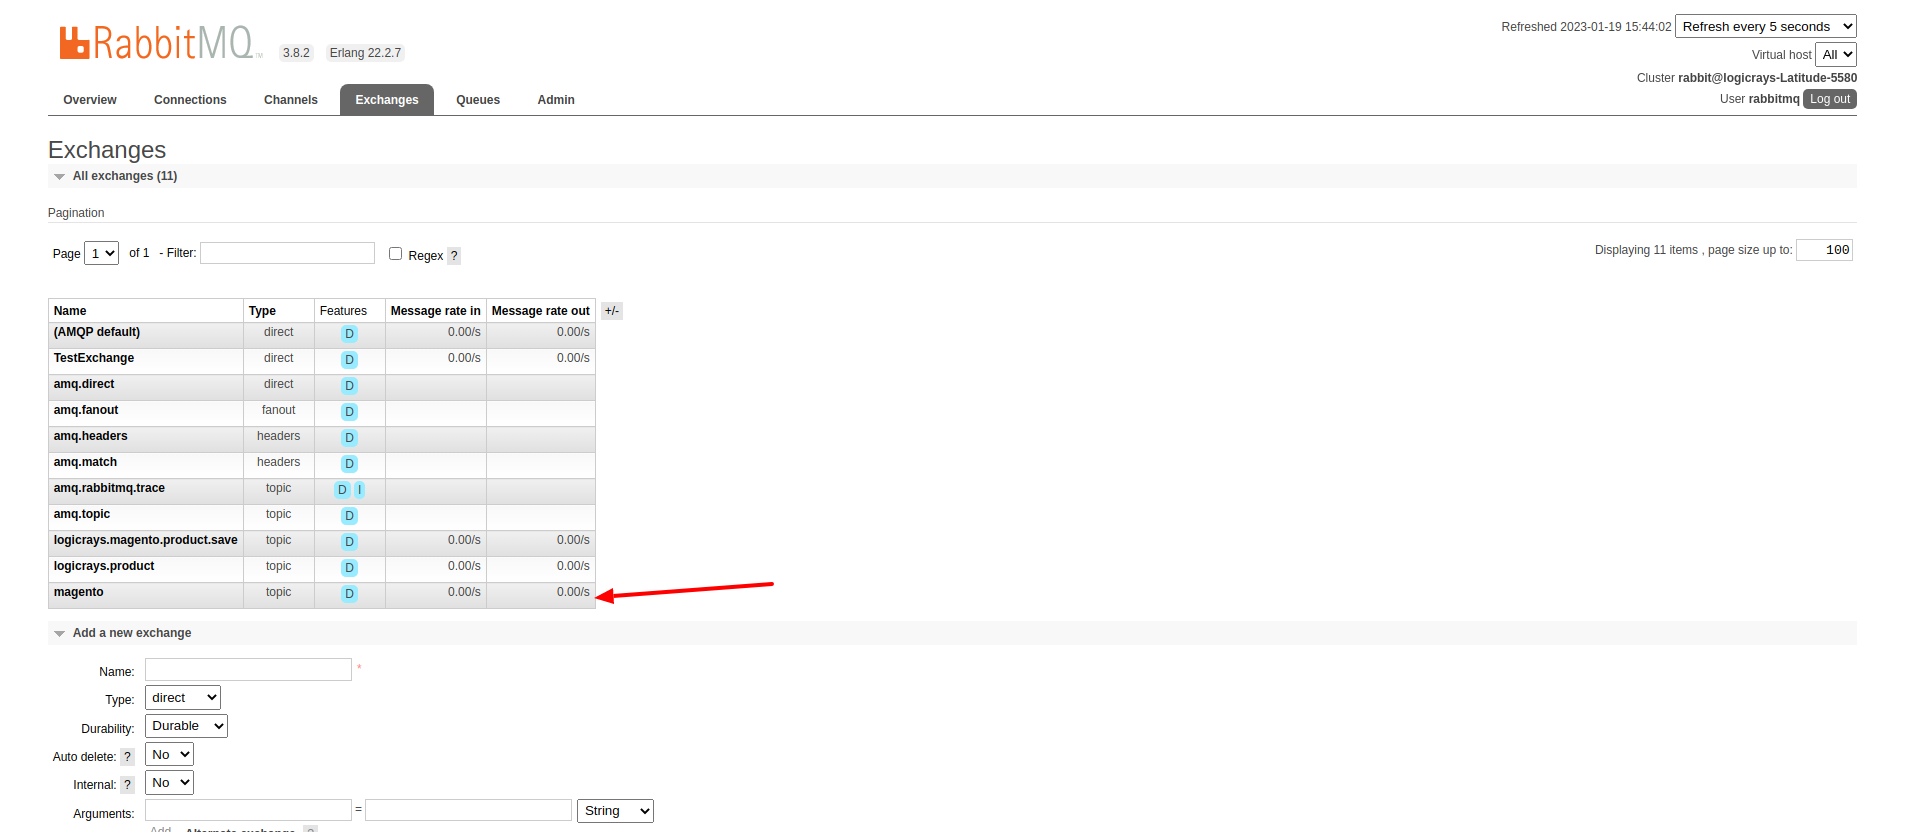
In RabbitMQ dashboard, message will appear on exchange tab
In queue tab, you will see
codegeneratormenu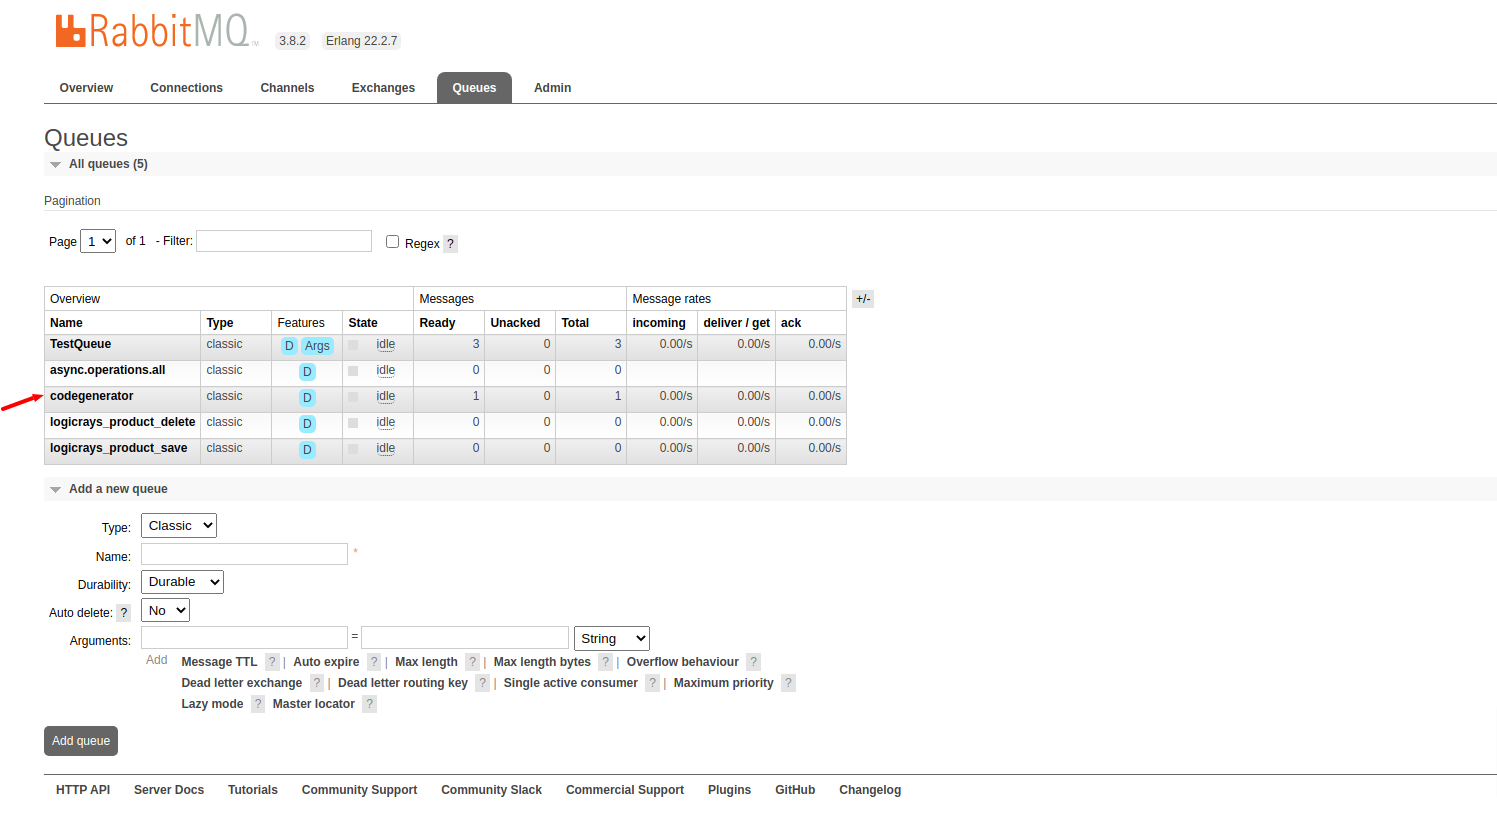
On click
codegeneratormenu, Go toGet messages, Click onGet Message(s)button, you will get message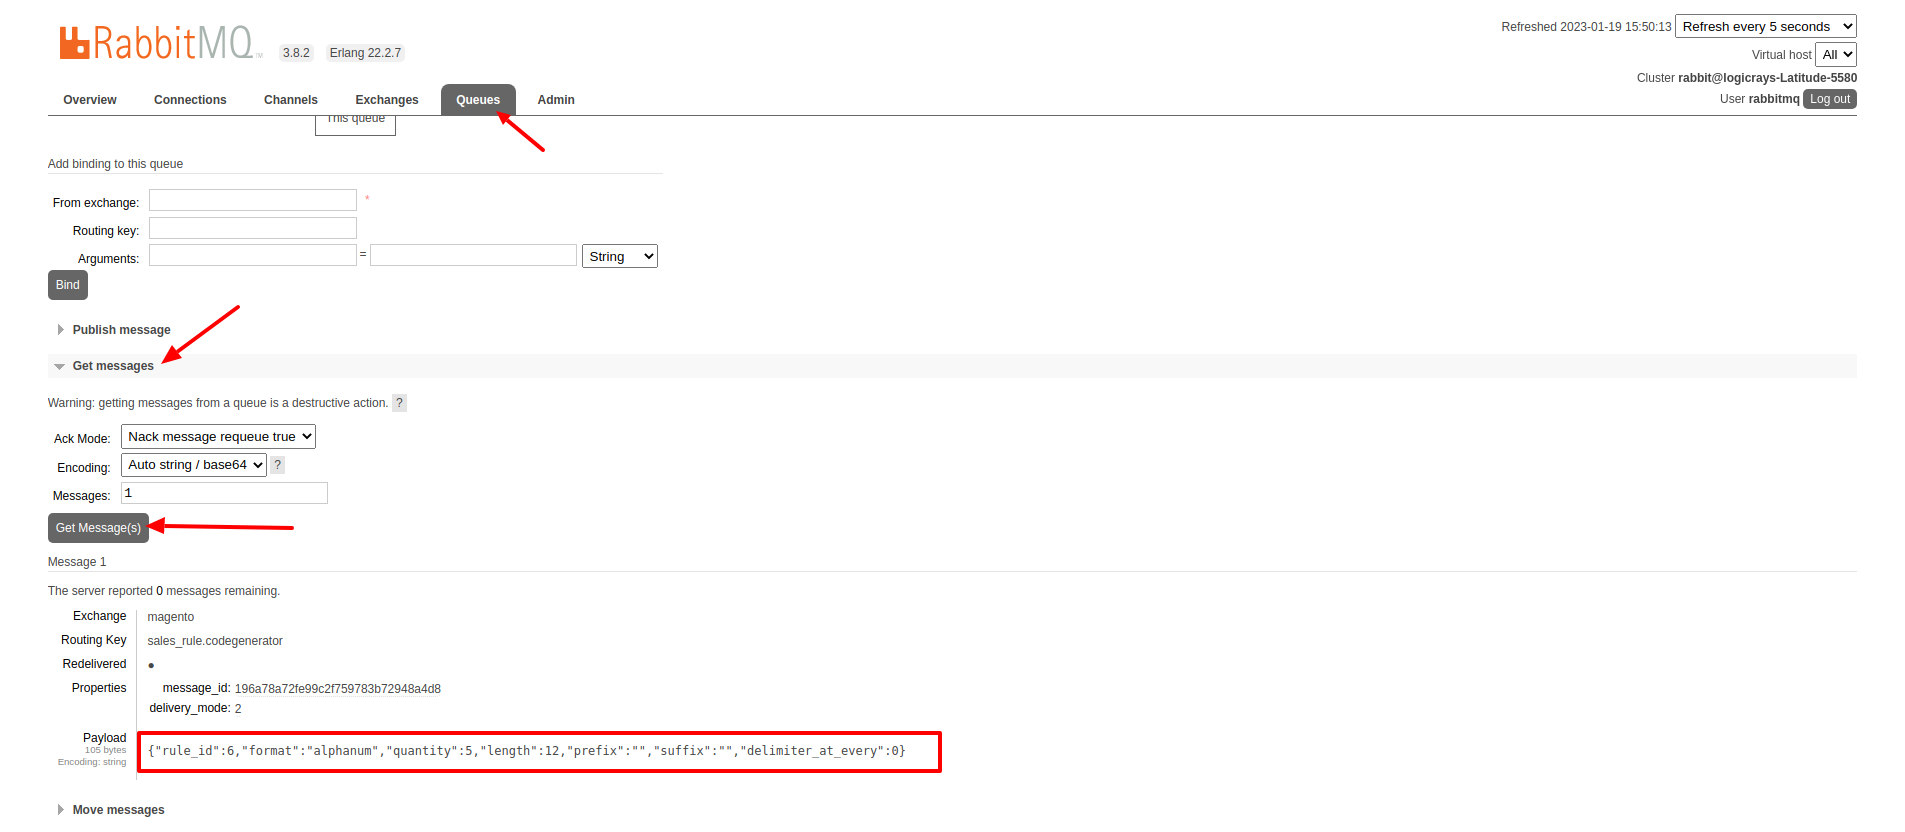
Conclusion
RabbitMQ is a powerful message broker which can help to improve your store speed. Also, it will be helpful to decrease the load on your MySQL server which can be helpful during load spikes.