Magento 2: MFTF Testing Framework
Complete guide for Magento Functional Testing Framework (MFTF) - an automated browser testing framework for Magento 2.
Table of Contents
Overview
What is MFTF?
The Magento Functional Testing Framework (MFTF) is:
An automated browser testing framework for Magento 2
Based on Codeception testing framework
Uses Selenium WebDriver for browser automation
Generates and executes tests using XML configuration
Supports data-driven testing with CSV files
Provides cross-browser testing capabilities
This tutorial will provide basic information of the MFTF test.
The Magento Functional Testing Framework (MFTF) is a framework used to perform automated end-to-end functional testing.
You have to follow the below steps for the running MFTF test and configure it in your system which is mentioned here.
Those steps are collected from the official MFTF test document.
Key Features
XML-based test configuration
Page Object Model design pattern
Data entity management
Action groups for reusable steps
Before/After hooks
Parameterized tests
Built-in Allure reports
MFTF Tests Location
MFTF supports two different locations for storing the tests and test artifacts (Just for knowledge where MFTF tests are available in Magento):
<magento_root>/app/code/<vendor_name>/<module_name>/Test/Mftf/is the location of local, customized tests.<magento_root>/vendor/<vendor_name>/<module_name>/Test/Mftf/is the location of tests provided by Magento and vendors.
If you installed Magento with Composer, please refer to vendor/magento/<module_dir>/Test/Mftf/ for examples.
Directory Structure
Following are MFTF test directory structures:
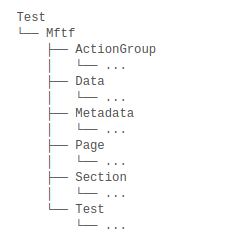
Fig. 20 Directory Structure
Important
Please follow the MFTF test steps for configuring and running the MFTF test in your local magento project setup. This document was successfully worked and tested on the Magento2.4.3-p1 version.
Prerequisites
Prepare Environment
Make sure that you have the following software installed and configured on your development environment:
PHP version supported by the Adobe Commerce or Magento Open Source instance under test
Composer 1.3 or later
Java 1.8 or later (Install JAVA and JRE)
Selenium Server Standalone 3.1 or later
ChromeDriver 2.33 or later or other webdriver in the same directory
System Requirements
Magento 2.3.x or higher
PHP 7.3 or higher
Composer 2.x
Java 8 or higher (for Selenium)
Chrome or Firefox browser
ChromeDriver or GeckoDriver
Required PHP Extensions
# Check installed extensions
php -m | grep -E 'curl|mbstring|gd|dom|SimpleXML|mcrypt|hash|openssl|zip|xmlwriter|xsl|soap'
Installation
Step 1: Install MFTF
Navigate to your Magento root directory:
cd /var/www/html/magento2
Install MFTF via Composer:
composer require magento/magento2-functional-testing-framework --dev
Install Composer
You can download composer here: https://getcomposer.org/download/
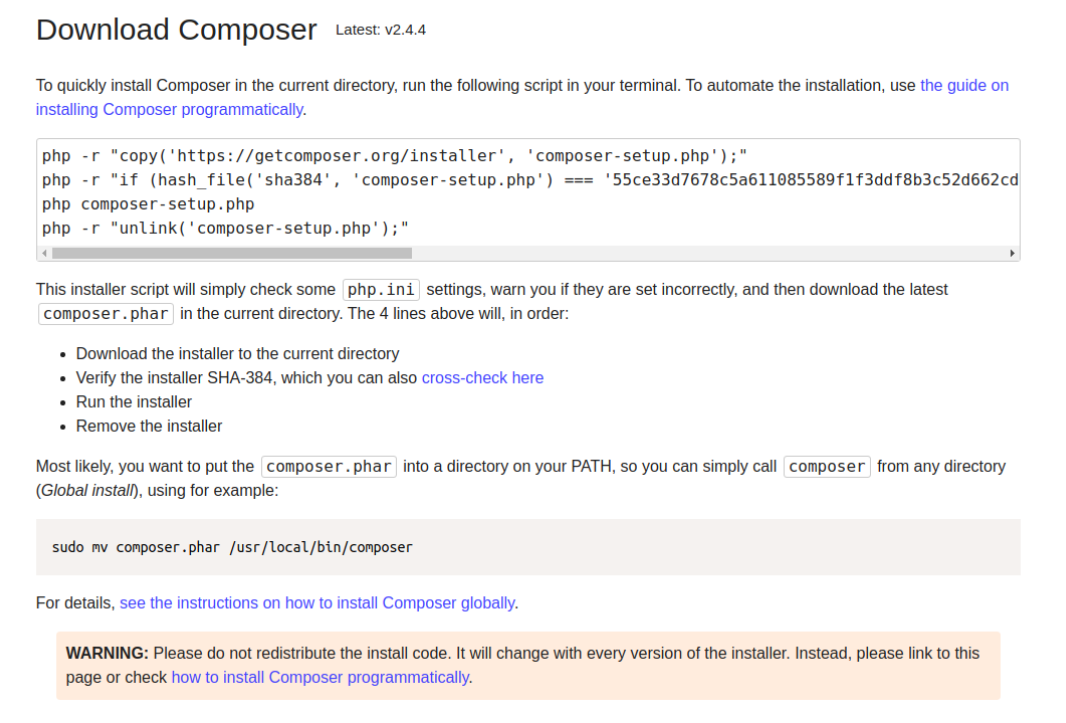
Fig. 21 Install composer
Install Java
You can download here: https://www.oracle.com/java/technologies/downloads/
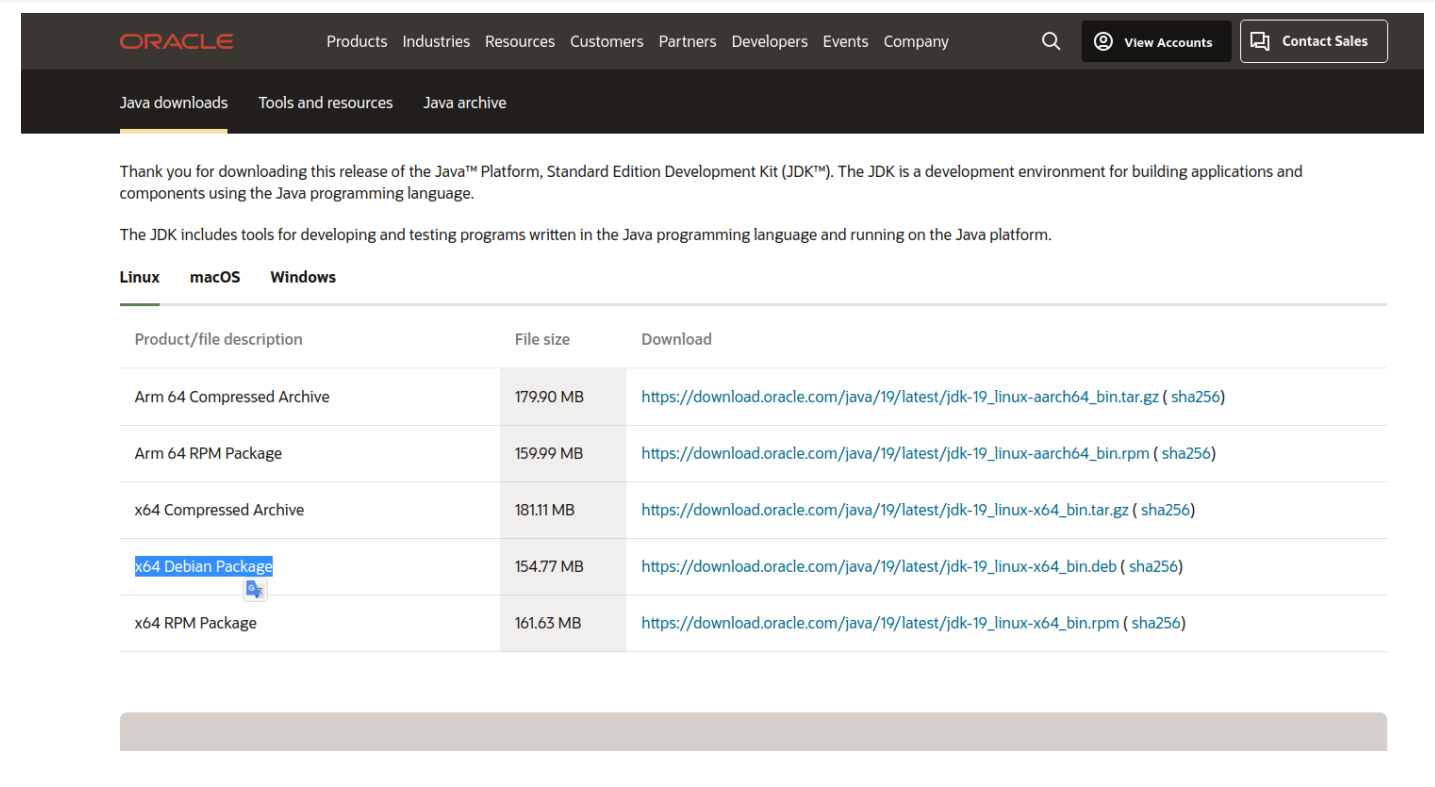
Fig. 22 Install java
You can check version: java --version

Fig. 23 Check Java version
Install ChromeDriver
Install ChromeDriver 2.33 or later version
Go to the site and download
Select ChromeDriver version

Fig. 24 Select ChromeDriver version
Download zip file according to your system
Extract the zip file on magento root
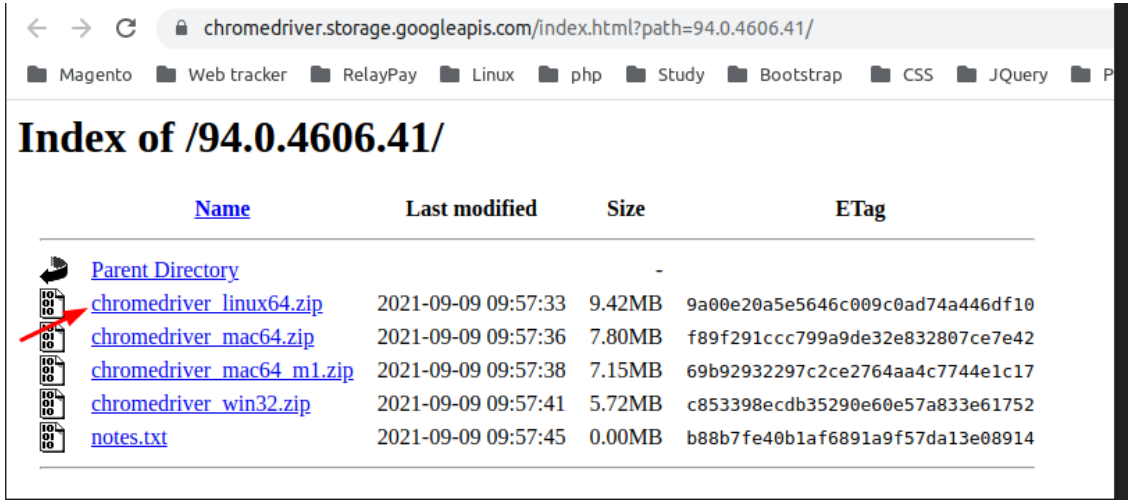
Fig. 25 Extract ChromeDriver zip
Alternatively, you can install via package manager:
# Install Chrome
wget https://dl.google.com/linux/direct/google-chrome-stable_current_amd64.deb
sudo dpkg -i google-chrome-stable_current_amd64.deb
sudo apt-get install -f

# Install Chromedriver
sudo apt-get install chromium-chromedriver

# Or download manually
wget https://chromedriver.storage.googleapis.com/LATEST_RELEASE
wget https://chromedriver.storage.googleapis.com/$(cat LATEST_RELEASE)/chromedriver_linux64.zip
unzip chromedriver_linux64.zip
sudo mv chromedriver /usr/local/bin/
sudo chmod +x /usr/local/bin/chromedriver
Download Selenium Server
Go to
/var/www/html/<magento_root>Run below command to download
curl -O http://selenium-release.storage.googleapis.com/3.14/selenium-server-standalone-3.14.0.jar

Fig. 26 Download Selenium Server
Or use wget:
wget https://selenium-release.storage.googleapis.com/3.141/selenium-server-standalone-3.141.59.jar# Start Selenium Server java -jar selenium-server-standalone-3.14.0.jar
# Run in background nohup java -jar selenium-server-standalone-3.14.0.jar &
Directory Structure After Installation
After executing above all commands, it will show below files on magento root which is highlighted on below screenshot.
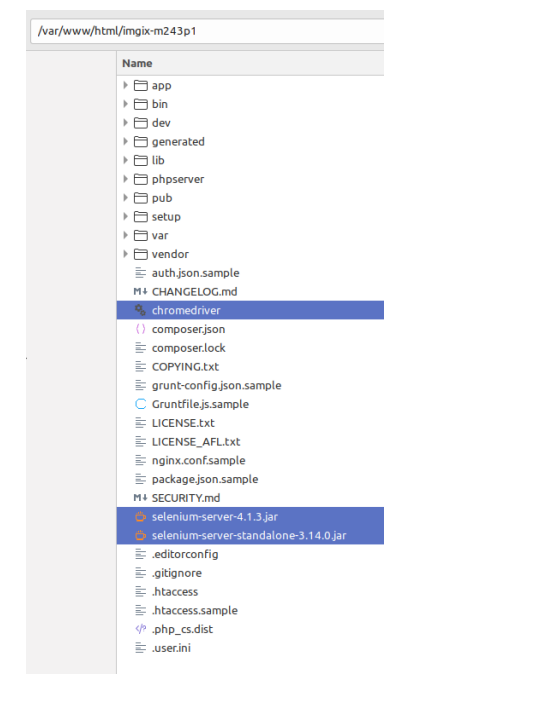
Fig. 27 Directory structure after installation
Find your MFTF Version
You can check MFTF version by two ways:
Using MFTF CLI
vendor/bin/mftf --version
Using Composer CLI
composer show magento/magento2-functional-testing-framework
Configuration
WYSIWYG Admin Configuration
A Selenium web driver cannot enter data to fields with WYSIWYG. To disable the WYSIWYG and enable the web driver to process these fields as simple text areas:
Log in to the Magento Admin as an administrator.
Navigate to Stores > Settings > Configuration > General > Content Management.
In the WYSIWYG Options section set the Enable WYSIWYG Editor option to
DisabledCompletely.Click Save Config.
Clear the cache
Change Security Settings
You have to change security settings from admin configuration To enable the Admin Account Sharing setting, to avoid unpredictable logout during a testing session, and disable the Add Secret Key in URLs setting, to open pages using direct URLs:
Navigate to Stores > Settings > Configuration > Advanced > Admin > Security.
Set Admin Account Sharing to
Yes.Set Add Secret Key to URLs to
No.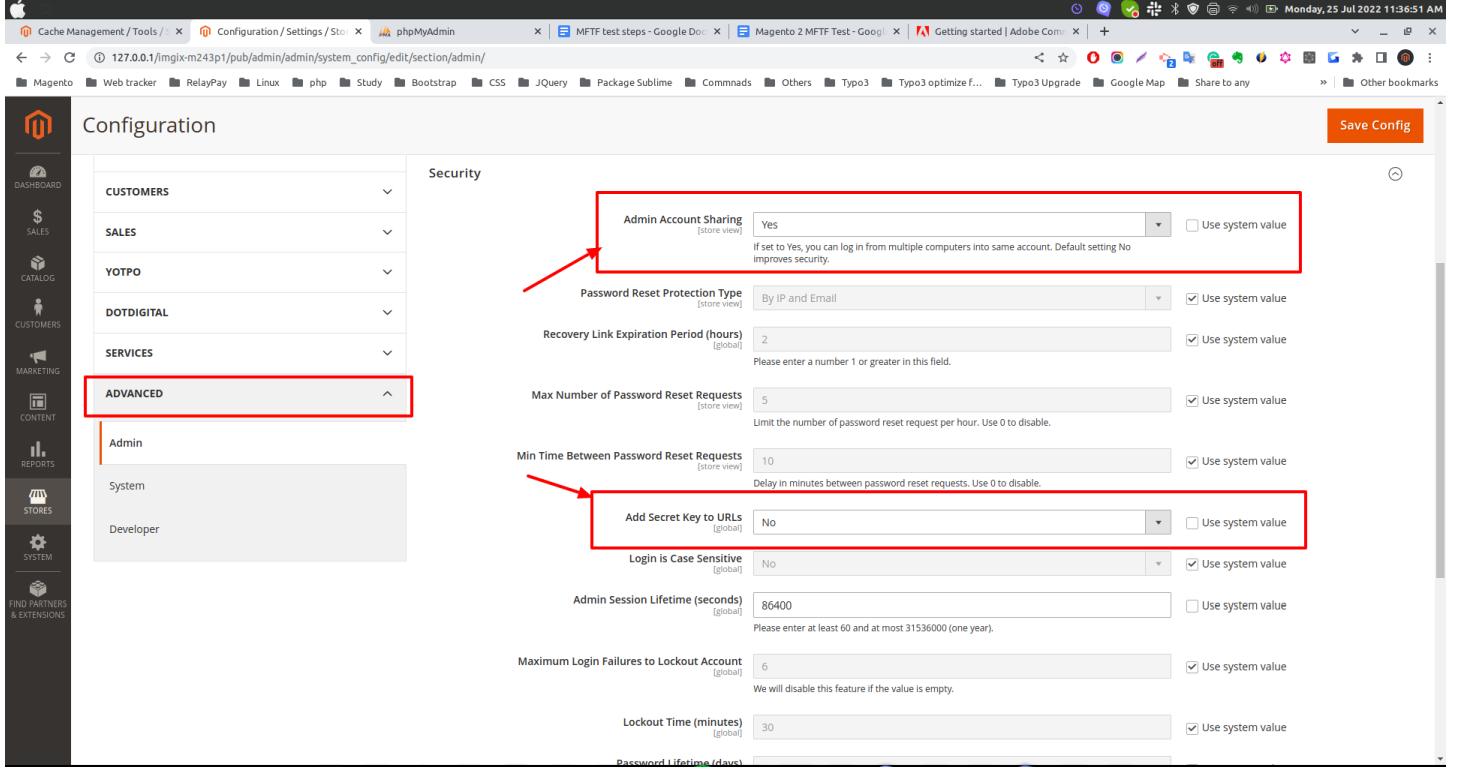
Fig. 28 System Configuration
Click Save Config.
Clear the cache
Note
If system config value not updated, you can fix by installing this module. Download and install this module: Click here
Check MFTF Health
Open new terminal window and go to
/var/www/html/<magento_root>Start your selenium-server by this command:
java -jar selenium-server-standalone-3.14.0.jarYou can check MFTF health by using this command:
vendor/bin/mftf doctor
Generate Configuration File
# Generate .env file
vendor/bin/mftf build:project
This creates .env file in dev/tests/acceptance/
Configure Environment
Edit dev/tests/acceptance/.env:
# Magento Admin Credentials
MAGENTO_ADMIN_USERNAME=admin
MAGENTO_ADMIN_PASSWORD=admin123

# Magento URLs
MAGENTO_BASE_URL=http://magento2.local/
MAGENTO_BACKEND_NAME=admin

# Browser Configuration
BROWSER=chrome
SELENIUM_HOST=127.0.0.1
SELENIUM_PORT=4444
SELENIUM_PROTOCOL=http
SELENIUM_PATH=/wd/hub

# Module Whitelist (optional)
MODULE_WHITELIST=Magento_Framework,Magento_ConfigurableProductDataExporter

# Elasticsearch Configuration
ELASTICSEARCH_VERSION=7
Steps For The Running MFTF Test
Go to your Magento root path
cd /var/www/html/magento2
Check MFTF version before running MFTF test
vendor/bin/mftf --versionError
If you getting the below error:
PHP Warning: require_once(/var/www/html/magento2): failed to open stream:
No such file or directory in /var/www/html/magento2/vendor/bin/mftf on
line 21
Fixed by modified this file:
<magento_root>/vendor/bin/mftf
Comment the below line:
// $autoloadPath = realpath(__DIR__ . '/../../../autoload.php');
Add a new line and set full path:
$autoloadPath = "/var/www/html/magento2/app/autoload.php";
After update above the line, execute mftf version command:
vendor/bin/mftf --version

Fig. 29 Successfully run mftf doctor command
Build the project
Run this command:
vendor/bin/mftf build:project
Error
If you getting the below error:
The codecept build command failed unexpectedly. Please see the above output for more details.
Fixed by modified this file:
<magento_root>/vendor/bin/codecept
Comment the below line:
// require __DIR__ . '/app.php';
Add a new line and set full path:
require "/var/www/html/magento2/vendor/codeception/codeception/app.php"; // Set Full path manually
Execute again build project command:
vendor/bin/mftf build:project
Edit environmental settings
In the
<magento_root>/dev/tests/acceptance/directory, edit the.envfile to match your system.Open .env file:
vim dev/tests/acceptance/.env
In the
.envfile replace the below code and save the file:MAGENTO_BASE_URL=http://127.0.0.1/magento2/pub #Here magento2 is base project directory MAGENTO_BACKEND_NAME=admin #Your magento admin name MAGENTO_ADMIN_USERNAME=admin #Your Magento admin username MAGENTO_ADMIN_PASSWORD=admin@123 #Your Magento admin password SELENIUM_CLOSE_ALL_SESSIONS=true BROWSER=chrome MODULE_ALLOWLIST=Magento_Framework,ConfigurableProductWishlist,ConfigurableProductCatalogSearch BROWSER_LOG_BLOCKLIST=other ELASTICSEARCH_VERSION=7 SELENIUM_HOST=127.0.0.1 SELENIUM_PORT=4444 SELENIUM_PROTOCOL=http SELENIUM_PATH=/wd/hub
Important
Please configure your Magento admin credentials.
Enable the Magento CLI commands
Run the below command:
cp dev/tests/acceptance/.htaccess.sample dev/tests/acceptance/.htaccess
Generate and run tests
Executing the below command:
vendor/bin/mftf generate:tests
Note
Sometimes, It will take some time to complete the execution.
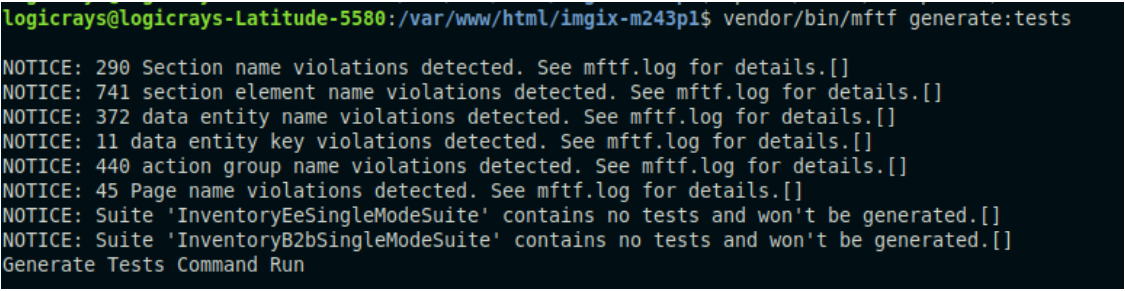
Fig. 30 Generate MFTF test
Start the Selenium server in new terminal window and Go to
<magento_root>pathExecuting the below command:
java -jar selenium-server-standalone-3.14.0.jar

Fig. 31 Started selenium server
Run a simple test (Admin Login Test)
Open a new tab on the terminal and go Magento root directory:
cd /var/www/html/magento2
Admin login mftf test:
vendor/bin/mftf run:test AdminLoginSuccessfulTest
Result
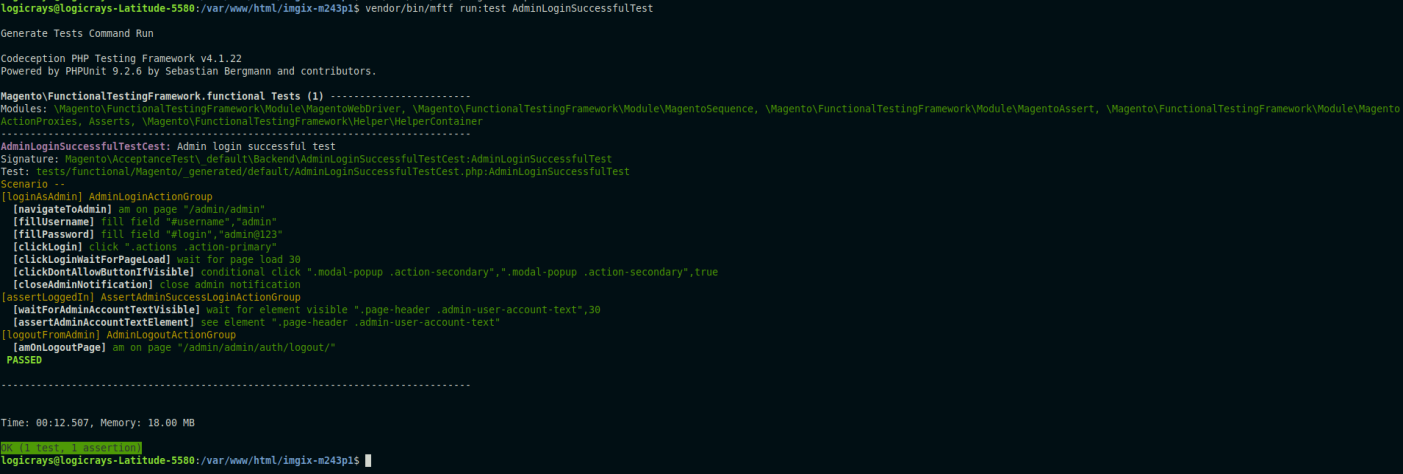
Fig. 32 Admin Login MFTF test
Configure Credentials
Create dev/tests/acceptance/.credentials:
# Magento Admin
magento/MAGENTO_ADMIN_USERNAME=admin
magento/MAGENTO_ADMIN_PASSWORD=admin123

# Database
magento/DB_HOST=localhost
magento/DB_NAME=magento2
magento/DB_USER=magento2user
magento/DB_PASSWORD=strong_password
MFTF Project Structure
Directory Layout
dev/tests/acceptance/
├── tests/
│   └── functional/
│       └── Magento/
│           └── FunctionalTest/
│               ├── Test/              # Test XML files
│               ├── ActionGroup/       # Reusable action groups
│               ├── Data/              # Test data entities
│               ├── Page/              # Page objects
│               ├── Section/           # Page sections
│               └── Metadata/          # Metadata files
├── .env                               # Environment configuration
├── .credentials                       # Credentials
└── _output/                           # Test results
Test Components
1. Test - Main test file
2. Page - Page URL configuration
3. Section - Page element selectors
4. Data - Test data entities
5. ActionGroup - Reusable action sequences
6. Metadata - Additional configuration
Workflow MFTF
How MFTF test work
Test
You should put one test in each file and the file name and test name must be the same and the name should follow camel casing.
For e.g StorefrontSellerCreateTest
Page
We can define pages that will be visited during test case execution.
The naming convention of the file name and page name must be the same, and the name will follow camel casing and all the names must end with the “Page” suffix.
For e.g StorefrontSellerCreatePage
Section
A <section> is a reusable part of a <page> and is the standard file for defining UI elements on a page used in a test.
ActionGroup
An action group is a group of actions (like clicking on the button, page load, etc.).
It is very useful to create a group of actions for better reusability.
For e.g LoginToStorefrontActionGroup
Data
Any test case will need some dummy data for completing the test case, like dummy data for a product to test product create flow, dummy data for the customer to test registration, and login feature.
All the data XML files must end with a data suffix.
MetaData
While executing test cases sometimes the tester might need some data entities to be created at runtime and used in the test or delete all the created data after the test is complete.
This can be done using metadata.
You can create operations like create, delete, update, and get.
After creating, our own MFTF test cases for a custom module, we need to run generate command so that Magento will consider our test cases as well with their own default cases.
Building Tests
Generate Test Files
# Generate tests from XML
vendor/bin/mftf generate:tests

# Generate specific module tests
vendor/bin/mftf generate:tests Magento_Catalog

# Generate single test
vendor/bin/mftf generate:tests --tests AdminLoginTest
Clean Generated Tests
# Clean all generated tests
vendor/bin/mftf clean:tests
Running Tests
Run All Tests
# Run all tests
vendor/bin/mftf run:test
Run Specific Tests
# Run single test
vendor/bin/mftf run:test AdminLoginTest

# Run multiple tests
vendor/bin/mftf run:test AdminLoginTest,AdminLogoutTest

# Run tests by group
vendor/bin/mftf run:group catalog
Run Tests in Parallel
# Run tests in parallel (4 processes)
vendor/bin/mftf run:parallel 4
Debug Mode
# Run with debug output
vendor/bin/mftf run:test AdminLoginTest --debug

# Run with verbose output
vendor/bin/mftf run:test AdminLoginTest --verbose
Creating Custom Tests
Example 1: Simple Login Test
Create Test/AdminLoginTest.xml:
<?xml version="1.0" encoding="UTF-8"?>
<tests xmlns:xsi="http://www.w3.org/2001/XMLSchema-instance"
       xsi:noNamespaceSchemaLocation="urn:magento:mftf:Test/etc/testSchema.xsd">
    <test name="AdminLoginTest">
        <annotations>
            <title value="Admin Login Test"/>
            <description value="Test admin user can login"/>
            <severity value="CRITICAL"/>
            <group value="admin"/>
        </annotations>

        <!-- Open admin page -->
        <actionGroup ref="AdminLoginActionGroup" stepKey="loginAsAdmin"/>

        <!-- Assert dashboard page -->
        <seeInCurrentUrl url="{{AdminDashboardPage.url}}" stepKey="seeDashboard"/>
        <see userInput="Dashboard" stepKey="seeDashboardTitle"/>
    </test>
</tests>
Example 2: Product Creation Test
Create Test/AdminCreateSimpleProductTest.xml:
<?xml version="1.0" encoding="UTF-8"?>
<tests xmlns:xsi="http://www.w3.org/2001/XMLSchema-instance"
       xsi:noNamespaceSchemaLocation="urn:magento:mftf:Test/etc/testSchema.xsd">
    <test name="AdminCreateSimpleProductTest">
        <annotations>
            <title value="Create Simple Product"/>
            <description value="Admin creates a simple product"/>
            <severity value="CRITICAL"/>
            <group value="catalog"/>
            <group value="product"/>
        </annotations>

        <before>
            <actionGroup ref="AdminLoginActionGroup" stepKey="loginAsAdmin"/>
        </before>

        <after>
            <actionGroup ref="AdminLogoutActionGroup" stepKey="logout"/>
        </after>

        <!-- Navigate to product creation page -->
        <actionGroup ref="AdminOpenProductIndexPageActionGroup" stepKey="goToProductIndex"/>
        <actionGroup ref="GoToCreateProductPageActionGroup" stepKey="goToCreateProduct">
            <argument name="product" value="SimpleProduct"/>
        </actionGroup>

        <!-- Fill product form -->
        <actionGroup ref="FillMainProductFormActionGroup" stepKey="fillProductForm">
            <argument name="product" value="SimpleProduct"/>
        </actionGroup>

        <!-- Save product -->
        <actionGroup ref="SaveProductFormActionGroup" stepKey="saveProduct"/>

        <!-- Assert success message -->
        <see userInput="You saved the product." stepKey="seeSuccessMessage"/>
    </test>
</tests>
Creating Action Groups
Create ActionGroup/CustomActionGroup.xml:
<?xml version="1.0" encoding="UTF-8"?>
<actionGroups xmlns:xsi="http://www.w3.org/2001/XMLSchema-instance"
              xsi:noNamespaceSchemaLocation="urn:magento:mftf:Test/etc/actionGroupSchema.xsd">
    <actionGroup name="CustomLoginActionGroup">
        <annotations>
            <description>Login to admin with custom credentials</description>
        </annotations>
        <arguments>
            <argument name="username" type="string"/>
            <argument name="password" type="string"/>
        </arguments>

        <amOnPage url="{{AdminLoginPage.url}}" stepKey="navigateToAdmin"/>
        <fillField selector="{{AdminLoginFormSection.username}}" userInput="{{username}}" stepKey="fillUsername"/>
        <fillField selector="{{AdminLoginFormSection.password}}" userInput="{{password}}" stepKey="fillPassword"/>
        <click selector="{{AdminLoginFormSection.signIn}}" stepKey="clickLogin"/>
        <waitForPageLoad stepKey="waitForDashboard"/>
    </actionGroup>
</actionGroups>
Creating Page Objects
Create Page/AdminCustomPage.xml:
<?xml version="1.0" encoding="UTF-8"?>
<pages xmlns:xsi="http://www.w3.org/2001/XMLSchema-instance"
       xsi:noNamespaceSchemaLocation="urn:magento:mftf:Page/etc/PageObject.xsd">
    <page name="AdminCustomPage" url="admin/custom/index" area="admin" module="Custom_Module">
        <section name="AdminCustomSection"/>
    </page>
</pages>
Creating Sections
Create Section/AdminCustomSection.xml:
<?xml version="1.0" encoding="UTF-8"?>
<sections xmlns:xsi="http://www.w3.org/2001/XMLSchema-instance"
          xsi:noNamespaceSchemaLocation="urn:magento:mftf:Page/etc/SectionObject.xsd">
    <section name="AdminCustomSection">
        <element name="title" type="text" selector="h1.page-title"/>
        <element name="saveButton" type="button" selector="#save"/>
        <element name="nameField" type="input" selector="#name"/>
        <element name="statusSelect" type="select" selector="#status"/>
    </section>
</sections>
Creating Data Entities
Create Data/CustomProductData.xml:
<?xml version="1.0" encoding="UTF-8"?>
<entities xmlns:xsi="http://www.w3.org/2001/XMLSchema-instance"
          xsi:noNamespaceSchemaLocation="urn:magento:mftf:DataGenerator/etc/dataProfileSchema.xsd">
    <entity name="CustomSimpleProduct" type="product">
        <data key="name">Custom Simple Product</data>
        <data key="sku" unique="suffix">custom-simple-</data>
        <data key="price">99.99</data>
        <data key="quantity">100</data>
        <data key="status">1</data>
        <data key="visibility">4</data>
    </entity>
</entities>
Test Annotations
Common Annotations
<annotations>
    <!-- Test metadata -->
    <title value="Test Title"/>
    <description value="Test description"/>
    <severity value="CRITICAL"/>  <!-- BLOCKER, CRITICAL, MAJOR, MINOR, TRIVIAL -->

    <!-- Grouping -->
    <group value="catalog"/>
    <group value="product"/>

    <!-- Issue tracking -->
    <stories value="Create Product"/>
    <features value="Catalog"/>

    <!-- Documentation -->
    <useCaseId value="MC-12345"/>
    <testCaseId value="MC-54321"/>
</annotations>
MFTF Actions
Common Actions
<!-- Navigation -->
<amOnPage url="{{AdminProductPage.url}}" stepKey="goToProduct"/>
<click selector="{{AdminMenuSection.catalog}}" stepKey="clickCatalog"/>

<!-- Form interaction -->
<fillField selector="#name" userInput="Product Name" stepKey="fillName"/>
<selectOption selector="#status" userInput="Enabled" stepKey="selectStatus"/>
<checkOption selector="#checkbox" stepKey="checkBox"/>
<uncheckOption selector="#checkbox" stepKey="uncheckBox"/>

<!-- Assertions -->
<see userInput="Success" stepKey="seeSuccess"/>
<seeInCurrentUrl url="/success" stepKey="seeSuccessUrl"/>
<seeElement selector=".success-message" stepKey="seeSuccessElement"/>
<dontSee userInput="Error" stepKey="dontSeeError"/>

<!-- Waits -->
<waitForPageLoad stepKey="waitForPage"/>
<waitForElementVisible selector=".modal" stepKey="waitForModal"/>
<waitForElementNotVisible selector=".loading" stepKey="waitForLoadingGone"/>
<wait time="5" stepKey="wait5Seconds"/>

<!-- JavaScript -->
<executeJS function="return window.location.href" stepKey="getUrl"/>
<executeJS function="document.querySelector('#id').click()" stepKey="jsClick"/>
Advanced Actions
<!-- Drag and drop -->
<dragAndDrop selector1="#source" selector2="#target" stepKey="dragDrop"/>

<!-- File upload -->
<attachFile selector="#file-input" userInput="image.jpg" stepKey="uploadFile"/>

<!-- Switch frames -->
<switchToIFrame selector="iframe" stepKey="switchFrame"/>
<switchToWindow userInput="window-name" stepKey="switchWindow"/>

<!-- Cookies -->
<setCookie userInput="cookieName" value="cookieValue" stepKey="setCookie"/>
<grabCookie userInput="cookieName" stepKey="getCookie"/>

<!-- Database operations -->
<createData entity="SimpleProduct" stepKey="createProduct"/>
<updateData entity="SimpleProduct" stepKey="updateProduct"/>
<deleteData createDataKey="createProduct" stepKey="deleteProduct"/>
Best Practices
Test Organization
Use Meaningful Names - Test names should describe what is being tested - Action steps should have descriptive stepKeys
Group Related Tests - Use annotations to group tests - Create test suites for related functionality
Reuse Action Groups - Extract common actions into action groups - Parameterize action groups for flexibility
Use Page Objects - Define page URLs in page objects - Keep selectors in section files
Test Data Management
Use Data Entities - Define test data in XML files - Use data generators for unique values
Clean Up Test Data - Use <after> hooks to clean up - Delete created entities after tests
Avoid Hard-Coded Values - Use data entities and variables - Make tests configurable
Performance Optimization
Run Tests in Parallel - Use multiple processes - Group tests efficiently
Use Action Groups - Reduce code duplication - Improve maintainability
Minimize Waits - Use specific wait conditions - Avoid unnecessary delays
Debugging Tests
Enable Debug Mode
# Run with debug
vendor/bin/mftf run:test AdminLoginTest --debug

# Generate tests with debug info
MFTF_DEBUG=true vendor/bin/mftf generate:tests
View Test Output
# Check generated test files
ls -la dev/tests/acceptance/tests/functional/Magento/FunctionalTest/_generated/default/

# View test output
tail -f dev/tests/acceptance/_output/*
Screenshots and Logs
Screenshots are automatically saved on test failure:
dev/tests/acceptance/_output/
├── debug/
├── screenshots/
└── failed/
Common Issues
Issue 1: Selenium Connection Failed
# Check if Selenium is running
ps aux | grep selenium

# Restart Selenium
pkill -f selenium
java -jar selenium-server-standalone-3.141.59.jar &
Issue 2: Chromedriver Version Mismatch
# Check Chrome version
google-chrome --version

# Download matching Chromedriver
# https://chromedriver.chromium.org/downloads
Issue 3: Element Not Found
Increase wait times
Check selector validity
Verify page is fully loaded
Issue 4: Stale Element Reference
Re-locate element before interaction
Use explicit waits
CI/CD Integration
GitLab CI Example
Create .gitlab-ci.yml:
mftf_tests:
  stage: test
  script:
    - composer install
    - vendor/bin/mftf build:project
    - vendor/bin/mftf generate:tests
    - java -jar selenium-server.jar &
    - vendor/bin/mftf run:group critical
  artifacts:
    when: always
    paths:
      - dev/tests/acceptance/_output/
    expire_in: 1 week
GitHub Actions Example
Create .github/workflows/mftf.yml:
name: MFTF Tests

on: [push, pull_request]

jobs:
  mftf:
    runs-on: ubuntu-latest
    steps:
      - uses: actions/checkout@v2

      - name: Setup PHP
        uses: shivammathur/setup-php@v2
        with:
          php-version: '8.2'

      - name: Install dependencies
        run: composer install

      - name: Setup MFTF
        run: |
          vendor/bin/mftf build:project
          vendor/bin/mftf generate:tests

      - name: Run tests
        run: vendor/bin/mftf run:group smoke

      - name: Upload artifacts
        uses: actions/upload-artifact@v2
        if: failure()
        with:
          name: mftf-output
          path: dev/tests/acceptance/_output/
Quick Reference
Essential Commands
Command |
Description |
|---|---|
|
Generate configuration files |
|
Generate test files from XML |
|
Run specific test |
|
Run test group |
|
Run tests in parallel |
|
Clean generated tests |
|
Check MFTF configuration |
Test Structure Template
<?xml version="1.0" encoding="UTF-8"?>
<tests xmlns:xsi="http://www.w3.org/2001/XMLSchema-instance"
       xsi:noNamespaceSchemaLocation="urn:magento:mftf:Test/etc/testSchema.xsd">
    <test name="YourTestName">
        <annotations>
            <title value="Test Title"/>
            <description value="Test description"/>
            <severity value="CRITICAL"/>
            <group value="groupName"/>
        </annotations>

        <before>
            <!-- Setup steps -->
        </before>

        <!-- Test steps -->

        <after>
            <!-- Cleanup steps -->
        </after>
    </test>
</tests>
See Also
Magento 2: Installation Guide - Magento 2 installation
Magento 2: Module Installation - Module installation